
We are back with the third edition of our ADISRA SmartView Frequently Asked Questions (FAQ) series, your resource for practical answers, expert tips, and real-world use cases straight from the ADISRA SmartView community.
Whether you are just starting out or already designing advanced HMI/SCADA applications, this month we are diving into key topics that some of our users are asking: how to deploy your application in a web browser, embed custom .NET controls, configure your project to auto-start on boot, and even run multiple ADISRA SmartView versions on the same machine.
Our goal? We aim to help you unlock the full power and flexibility of ADISRA SmartView, no matter where you are in your automation journey.
Let us dive in!
What’s the best way to display my ADISRA SmartView application in a web browser?
ADISRA allows you to display your application at runtime through the ADISRA SmartView Viewer (locally and remotely) and on commonly used web browsers. This can be achieved using the ADISRA SmartView web viewer, which is configured to allow the project to be executed as HTTP or HTTPS.
Here’s how it works:
ADISRA SmartView converts your graphic screens into HTML5 and Java files, which can then be hosted on a web server. This enables users on the same network or even across the internet to view and interact with your application using a standard browser on a PC, tablet, or smartphone.
Web Deployment Workflow
1- Install a Web Server
Microsoft’s website provides many resources on installing Microsoft IIS Windows Web Server and Apache Tomcat Web Server. Also, ADISRA has a whitepaper on deploying your application on the web using Microsoft IIS Windows Web Server, which is located here.
2- Configure Web Server Location in ADISRA SmartView
In the ADISRA SmartView development environment:
Go to Settings > Web
Specify the internal port for data exchange between the web client and the runtime server and confirm the folder where the HTML files will be saved, as shown below.

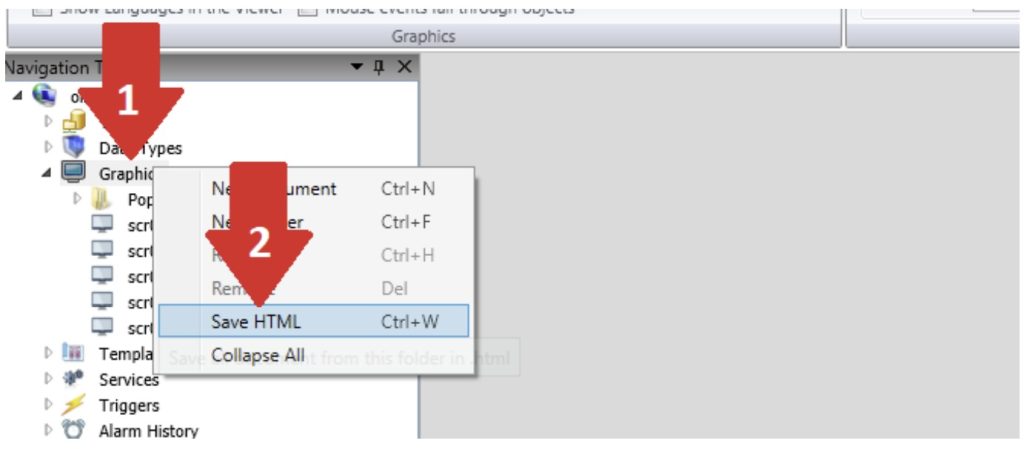
3- Export Graphics as HTML
Right-click the Graphics document in your project.
Select “Save HTML.”
This action generates HTML pages for each screen in your application.
4- View on Browser
Once published, you can access your application on any web browser that points to your web server’s IP and port.
ADISRA provides a helpful video walkthrough on how to publish your project to the web. Watch the Setup Video here.
We have also put together a step-by-step whitepaper on publishing your project using Microsoft IIS. Read the Web Deployment Guide.
With this setup, your ADISRA SmartView application is ready to run anywhere, without sacrificing the features of a desktop HMI. Whether you are supporting remote operators, mobile users, or simply aiming to modernize your deployment, this browser-based approach makes it easy.
Can You Use Custom .NET Controls in ADISRA SmartView?
Yes, and here is how.
One of the features of ADISRA SmartView on Windows is its ability to host and run custom .NET controls directly within your HMI/SCADA screens. Suppose you are a developer or system integrator looking to extend the functionality of your automation application. This opens the door to a wide range of possibilities, from sleek visualization elements to specialized third-party libraries.
Because ADISRA SmartView acts as a .NET container, it allows you to:
– Embed custom .NET components like interactive charts, gauges, or enhanced input controls.
– Incorporate third-party libraries for functions like encryption, advanced reporting, or high-precision math.
– Reuse existing .NET code, avoiding time-consuming rewrites for another platform.
– Expand beyond traditional HMI/SCADA functionality by tailoring your solution to your needs.
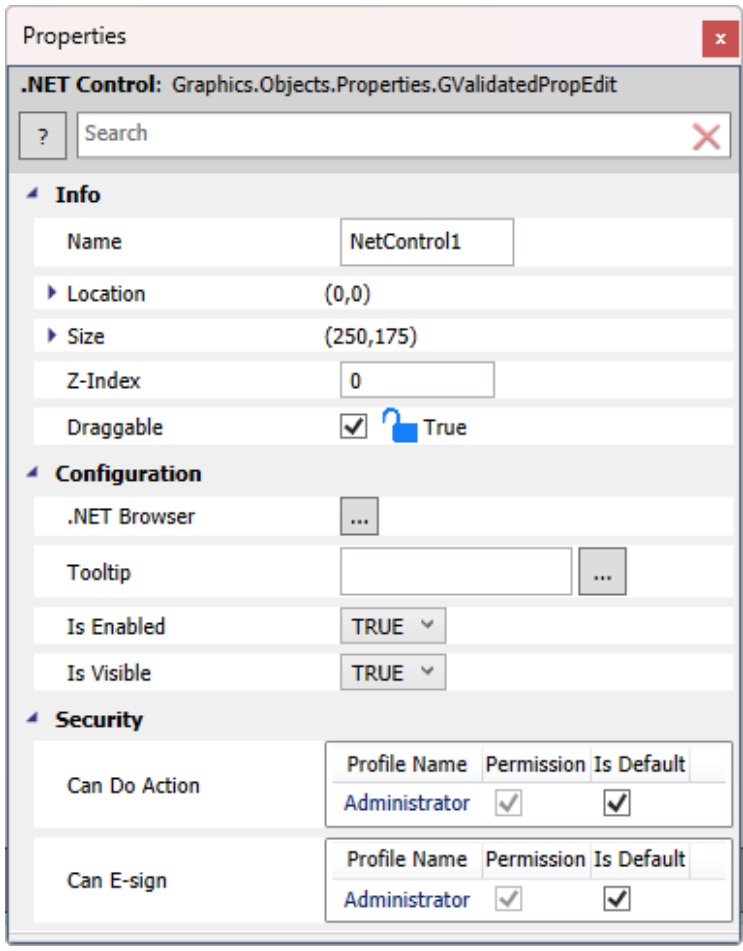
How to Add a .NET Control in SmartView
It is easy to get started. Navigate to the Advanced Objects section and click the .NET Controls icon. This will open a dialog box with available options. Select the control you want and drop it into your graphic document.

Once placed, you can fine-tune the behavior of the control using the Properties tab.
A Note About Web and Cross-Platform Compatibility
Because the classic .NET Framework is designed specifically for Windows, these controls are best used in Windows-based runtime environments. If you need your screens to be web-accessible or run across platforms like Linux or macOS, we recommend using Template Objects instead.
Template Objects let you create reusable, cross-platform graphical elements from the native object library inside ADISRA SmartView. You can build them once in a Template Document, then reuse or customize them across multiple screens, ensuring both consistency and performance across different deployment targets.
ADISRA SmartView also includes a library of prebuilt templates, which can be added or modified to match your exact design and functionality requirements.
While our .NET integration leverages the traditional Windows-based .NET Framework, ADISRA SmartView also supports the more modern, cross-platform .NET (formerly .NET Core), enabling development that spans Windows, Linux, and macOS environments.
So whether you are embedding .NET controls for a Windows runtime or designing an application for the web, ADISRA SmartView gives you the flexibility to build the right solution for your industrial automation needs.
Can I configure my ADISRA SmartView project to start automatically when the system boots?
Yes, you can configure ADISRA SmartView to automatically launch your project or even the Remote Viewer each time Windows or Linux starts. This is especially useful for unattended systems or industrial panels that must resume operation immediately after a reboot.
For detailed step-by-step instructions on configuring your ADISRA SmartView project to launch automatically at Windows startup, check out the instructions here.
On Linux
If you are running ADISRA SmartView on a headless, embedded Linux system, you can set it up to automatically start your project at boot using a systemd service.
Here is how to do it:
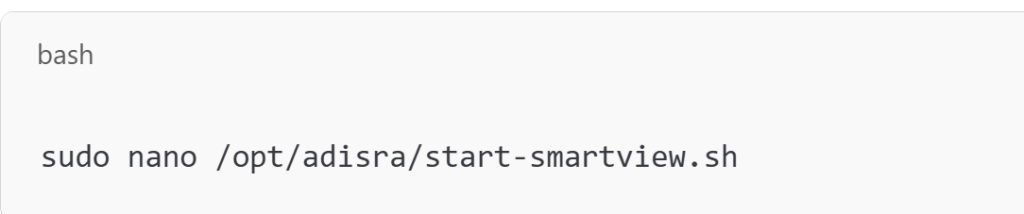
Step 1: Create a Shell Script to Launch the Runtime 1. Open a terminal and create a shell script:
2. Add the following content to launch the runtime:
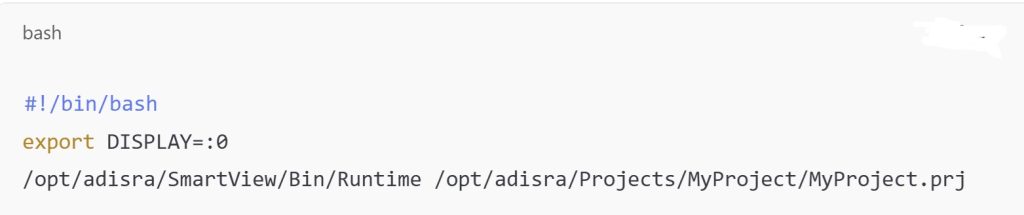
Replace the path to the Runtime executable and your .prj file as needed.
3. Make the script executable:
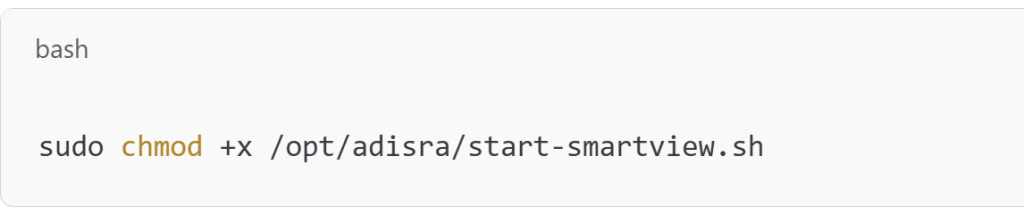
Step 2: Create a systemd Service
1. Create a new service file:

2. Paste the following content:
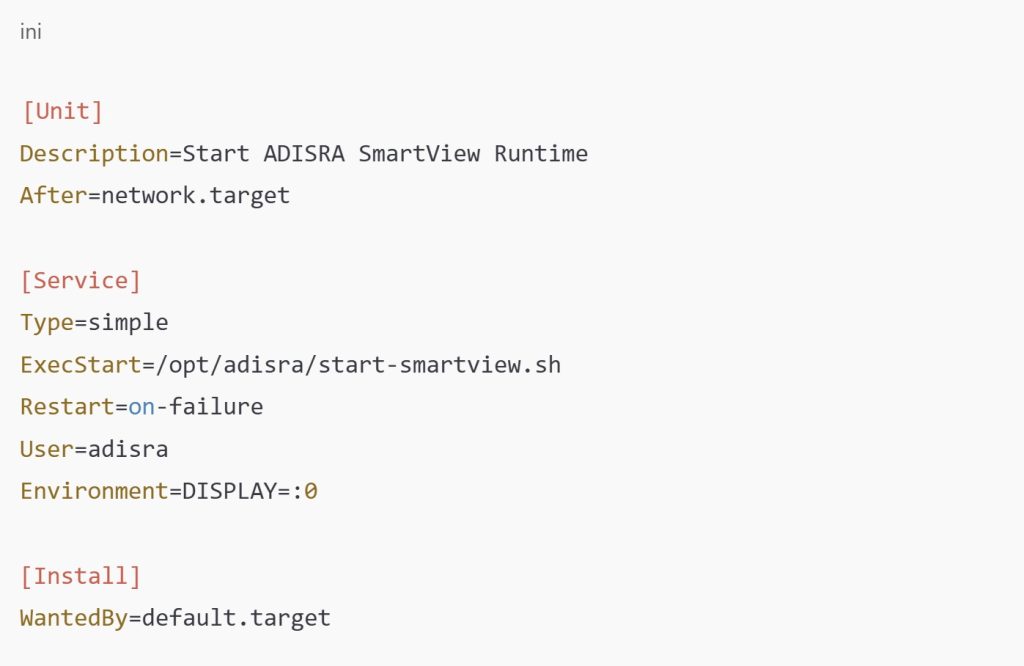
Make sure to change User=adisra to the correct Linux user running your X session.
Step 3: Enable the Service
Enable and start the service so it launches on boot:

Test It
Reboot your Linux system and check whether the project launches automatically:

After login, the ADISRA SmartView runtime should start and load your project.
Is it possible to install and run two versions of ADISRA SmartView on the same machine?
Yes, you may have multiple ADISRA SmartViews on the same machine. For example, you might want to maintain an older project while testing a newer release. This can be done by following the steps below:
Access the Installed Version’s Directory
If ADISRA SmartView version 4.X is installed, locate its installation folder by right-clicking the desktop shortcut and selecting “Open file location.”
Duplicate the Runtime Folder
Inside the ADISRA SmartView installation directory, find the folder named “Bin”.
Copy and paste this folder into the same directory.
Rename the copied folder to something descriptive like “Bin_4_0_4_0_Patch3”.
This allows you to preserve the runtime environment of a specific version, even if you install a newer release later. By launching ADISRA SmartView from the copied Bin folder, you can maintain compatibility and test across versions without conflict.
Create Separate Shortcuts for Each Version
To easily launch different versions:
Open the newly renamed Bin_4_0_4_0_Patch3 folder.
Right-click on IDE.exe (the development environment) or Runtime.exe (for direct project execution).
Select “Create Shortcut.”
Move the shortcut to your desktop or taskbar and rename it (e.g., SmartView 4.0 Patch 3).
Repeat this process for other versions you install. This allows you to launch a specific version directly without interfering with the others.
Bonus Tip: Managing Projects Across Versions
If you are switching between versions, be mindful of project compatibility. Opening a project in a newer version may alter its structure, making it incompatible with older versions. Always back up your project before switching versions.
Conclusion:
That is a wrap for this month’s edition of our Frequently Asked Questions (FAQ) blog. From optimizing remote access with web deployment to embedding .NET controls, enabling automatic startup, and managing multiple versions, ADISRA SmartView provides the flexibility and power you need to create innovative and reliable automation solutions.
This FAQ series is designed to give you practical tips you can immediately put to work. If you found this helpful, let us know, and be sure to send in your questions. You might see them featured in an upcoming edition.
Need personalized guidance or help with your SmartView setup? Reach out to our support team at support@adisra.com or join us for our next live webinar on May 22nd at 9:30 a.m. CDT:
“Discover How to Extend the Power of ADISRA SmartView Through Seamless Integration With Third-Party Packages.”
Click here to register.
Ready to explore on your own? Download ADISRA SmartView and start building your next great solution today.
Let us keep building better automation solutions together.