
We are thrilled to see another wave of insightful questions from our users, system integrators, and partners. Keep them coming! Every question gives us a chance to explore new ways ADISRA SmartView is helping you design, deploy, and maintain smarter, more connected industrial applications.
In this latest installment of our “Your Questions Answered” series, we are diving into real-world topics that matter most to you, from running multiple ADISRA SmartView installations on the same machine to setting up features like AuditDB.
Whether you are new to ADISRA SmartView or building complex, data-driven applications, these insights will help you unlock its full potential and take your projects to the next level.
Q: I am currently using ADISRA SmartView but want to test a newer version. Can both versions coexist on the same PC without conflicts?
Yes, multiple versions of ADISRA SmartView can coexist on the same computer. However, it is important to understand that each project or application developed in ADISRA SmartView is tied to the specific version in which it was created.
Each new release introduces new features and functionality, so maintaining version alignment ensures full compatibility. In other words, a project developed in a particular version of ADISRA SmartView can only be executed by the Runtime of that same version. Both the Engineering and Runtime environments must match for the application to run correctly.
The good news is that you can install as many versions as you would like on your machine. This means you can continue to support existing applications while testing or developing new ones in a newer version.
You can easily verify your project’s version within the Engineering Environment of ADISRA SmartView.
In run-time:
Q: What is the recommended process for installing multiple versions of ADISRA SmartView on the same PC for testing or migration purposes?
To safely maintain and use two versions of ADISRA SmartView on the same computer, follow the steps below:
1. Locate Your Current Installation
If you already have ADISRA SmartView 4.0.4.0 installed, navigate to the installation directory. The default path is:
C:\Program Files (x86)\ADISRA\Adisra SmartView
2. Duplicate the “Bin” Folder
Inside this directory, locate the folder named “Bin.” Copy and paste this folder into the same location, then rename the copy, for example, to “Bin4040”, to make it easy to identify later.
3. Install the New Version
Next, install ADISRA SmartView 4.1. During installation, only the files in the original “Bin” folder will be updated. Your renamed “Bin4040” folder will remain intact, allowing both versions to coexist on the same machine.
4. Create Shortcuts for Easy Access
For convenience, open your “Bin4040” folder and create shortcuts for the main executables:
– Suite.exe – launches the Engineering Environment
– Runtime.exe – opens the Runtime application
This approach ensures you can test, migrate, and support projects across multiple versions of ADISRA SmartView without conflicts.
Q: I am trying to register my ADISRA SmartView software—where do I go to open the “Register License” tool?
A: You can download the latest version of ADISRA SmartView directly from our website here.
After downloading and installing, ADISRA SmartView runs in Demo Mode by default.
- The Development Environment operates for 30 consecutive days.
- The Runtime operates for 2 hours and can be manually restarted.
To permanently activate the software, you will need to register your license. There are several convenient ways to access the “Register License” tool, depending on how you prefer to work.
Option 1: From the ADISRA SmartView Launcher
The Launcher serves as your central hub for ADISRA SmartView, offering quick access to all modules, documentation, support resources, and recently used projects.
Within the Launcher, you will find a Licensing tab that lets you check, register, and validate your license. From here, you can:
- Select your license type (Hard Key or Soft Key)
- Generate a Site Code (to send to ADISRA for activation)
- Validate your license after receiving your Site Key
The process is straightforward and ensures that both your Development and Runtime environments are using the same version of ADISRA SmartView.
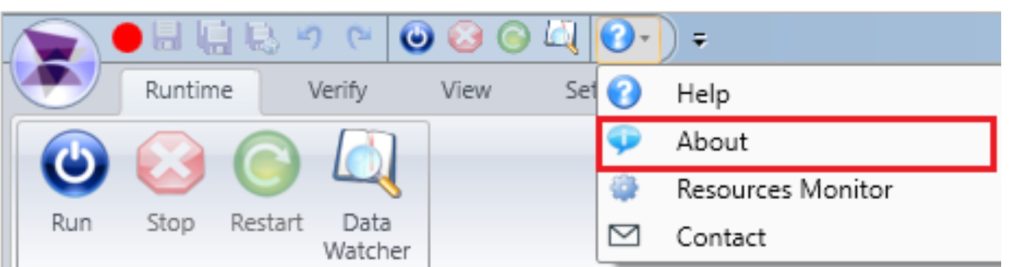
Option 2: From the License Ribbon
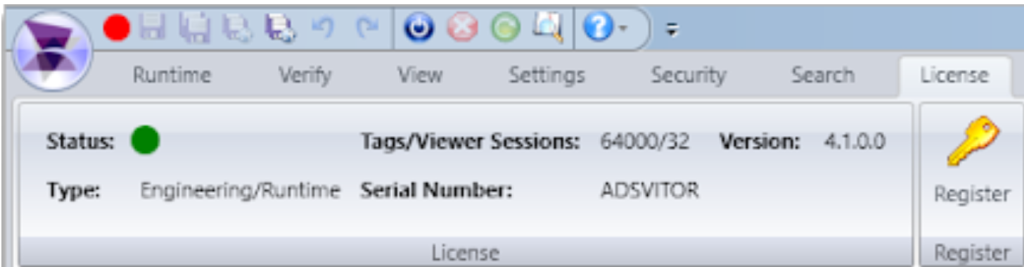
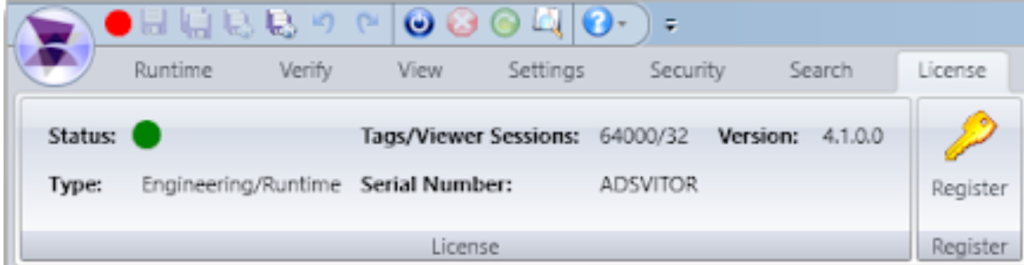
Inside the Engineering Environment, you will also find a License Ribbon that provides real-time information about your current license and includes a button to open the License Register window.
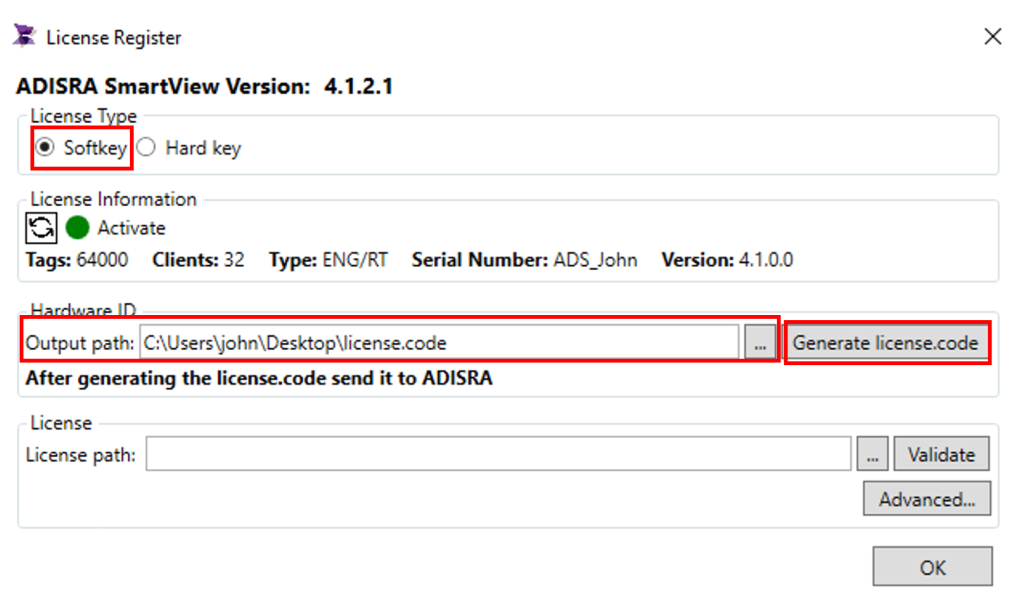
From the License Register dialog box:
- Select your License Type (SoftKey or HardKey)
- (Optional) Change the Output Path for the generated code file
- Click Generate License Code
This creates a License Code file that you will send to ADISRA to activate your license.
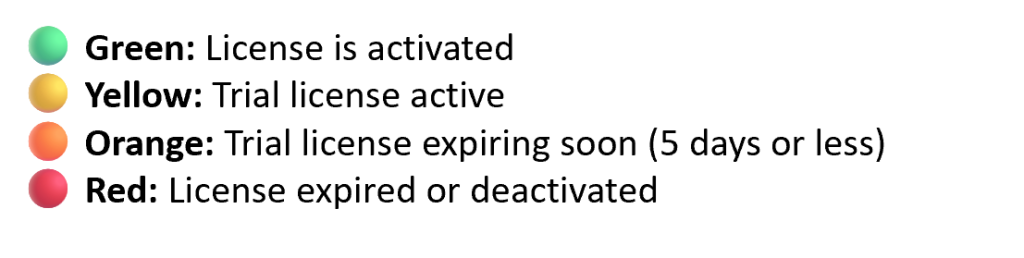
License Status Indicators
ADISRA SmartView displays the current license status using color indicators:
Option 3: From the Windows Start Menu
You can also open the tool directly from Windows:
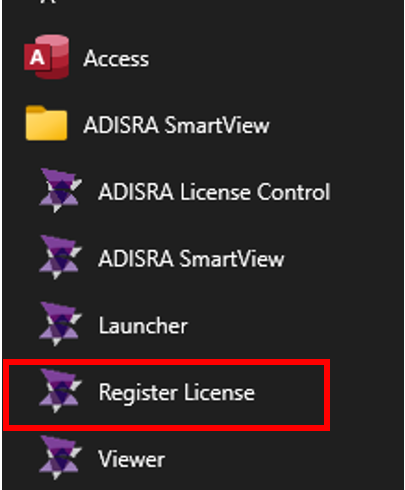
Click the Start button on your Windows toolbar.
– Go to All Programs → ADISRA SmartView.
– Click Register License.
Other Access Methods
– Navigate to the ADISRA SmartView Bin folder and run LicenseRegister.exe.
– Search for “Register” in the Windows search bar and select Register License from the results.
No matter which method you choose, the Register License window below will appear.
Send the License Code to ADISRA
After generating your License Code, send the file along with your serial number (if using a hard key) to license@adisra.com
Our team typically provides a very quick turnaround; you will receive your License File promptly via email.
Install and Validate the License
Once you have received your License File, open the License Register dialog box again.

- Enter or browse to the path of your License File.
- Click Validate.
This confirms the installation of licenses and permanently activates your ADISRA SmartView software.
Q: Can Boolean tags in ADISRA SmartView have alarm conditions?
A: Yes, Boolean tags in ADISRA SmartView can have alarm conditions.
A Boolean tag is a primitive data type that can hold one of two values: True or False. These values correspond to non-zero and zero values, respectively, and can be used interchangeably within your project logic.
Configuring Alarms for Boolean Tags
In the Properties tab of a Boolean tag, you will find several configuration fields, including the Alarm Settings button.
Clicking “Alarm Settings” opens the alarm configuration section in the Tags document, where you can define and manage alarm conditions for that tag.
The alarm property will dynamically reflect whether any alarms linked to the tag are active:
– True: At least one alarm condition is active.
– False: No alarm conditions are active.
Using Boolean Values to Trigger Alarms Programmatically
In addition to the standard configuration, Boolean tags can also trigger alarms programmatically using a Service Document.
A Service Document allows users to create logical programs in C# that execute in the background during runtime. These can be triggered from anywhere within an ADISRA SmartView application.
Using these scripts, you can call the SVAlarms functions to:
– Edit tag alarms
– Interact with alarm notifications
– Retrieve current alarm status
This makes alarms fully dynamic, allowing you to create adaptive alarm behaviors based on application logic.
Rule-Based System Integration
You can also use ADISRA SmartView’s Rule-Based Expert System to trigger alarms from Boolean tags. Rules can evaluate tag states and automatically execute alarm actions when specific logical conditions are met—offering a powerful way to link alarm logic with higher-level system intelligence.
Q: What is the Tooltip Configuration field in ADISRA SmartView, and how is it used?
A: The Tooltip Configuration field in ADISRA SmartView allows you to define the text that appears when a user hovers the mouse over an object during runtime. Tooltips are a great way to provide additional context, instructions, or live data without cluttering the screen.

You can assign static text, tags, or even a ternary expression to the Tooltip field. Using a tag or expression allows the tooltip message to change dynamically at runtime based on system conditions or tag values.

If you need more space to write your tooltip or to enter a complex ternary expression, click the “…” button next to the Tooltip field. This opens the Script Window, where you can easily:
– Enter or edit longer tooltip text
– Write ternary expressions for dynamic tooltips
– Validate your expression to ensure it’s correctly configured
This flexibility makes it easy to tailor tooltips for both usability and interactivity, helping operators receive the right information at the right time.
Q: In ADISRA SmartView, what is the purpose of the “AuditDB”?
In ADISRA SmartView, the AuditDB (Audit Database) records all activities that require an electronic signature (e-signature), for example, when an operator changes a setting, such as time, temperature, or ingredients.
Instead of storing this information in a proprietary file, ADISRA SmartView securely logs these records in a SQL database, making it easier to manage, search, and integrate with other systems.

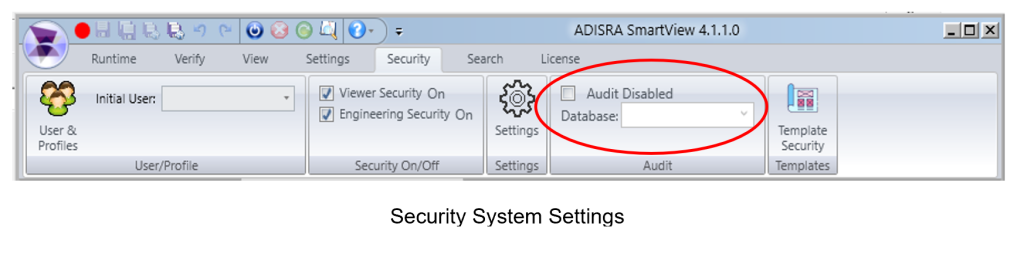
How to Set Up the AuditDB in ADISRA SmartView
Setting up the Audit Database only takes a few steps:
1. Configure a SQL Database Connection
– Open the Engineering Environment in ADISRA SmartView.
– On the top ribbon, click the Database Connections tab.
– In the Database Connections window, click the “+” icon to add a new database.
– Choose your Data Source (ADISRA SmartView supports the most popular databases such as Microsoft SQL Server, Microsoft Access, ODBC, Oracle, and PostgreSQL).
– After entering your connection details, click OK, then give your connection a name, for example, AuditDB.
– You will now see AuditDB listed in the Database Connections window.
For more details on how ADISRA SmartView supports FDA 21 CFR Part 11 compliance, refer to our previous blog post and download the accompanying whitepaper for reference.
Conclusion
Every question we receive helps us create more valuable content for you—and shows how ADISRA SmartView continues to simplify and strengthen industrial automation across real-world applications.
If there’s a topic you’d like us to explore in our next “Your Questions Answered” post, we’d love to hear from you!
Send your questions to info@adisra.com.
Not yet using ADISRA SmartView? You can download the latest version here and start exploring its full potential.
Prefer a more personal approach? Request a demo, and we will be happy to walk you through ADISRA SmartView and answer your questions directly.
Stay tuned for the next installment of “Your Questions Answered”, where we will continue sharing practical tips and insights to help you get the most out of ADISRA SmartView.

Save the date – ADISRA’s next webinar will be on 9 December 2025 – 9:30 a.m. CST; 10:30 a.m. COT; 3:30 p.m. UTC/GMT; 4:30 p.m. CET; 5:30 p.m. EET; 11:30 a.m. (10 Dec) MYT;
Entitled: “From the Shop Floor to the Cloud: Maximizing OEE Everywhere.”
Manufacturers today face a critical challenge. How to achieve complete visibility into production efficiency, whether on a single machine, across an entire plant, or throughout the one global facilities network.
Please join us to explore how to optimize OEE (Overall Equipment Effectiveness) on-premises and in the Cloud.
You can register for the webinar here.
ADISRA®, ADISRA’S logo, InsightView®, and KnowledgeView® are registered trademarks of ADISRA, LLC.
© 2025 ADISRA, LLC. All Rights Reserved.