ADISRA SmartView blocks certain characters and keywords from being used as a name for a Graphic or tags. Please take a look at the rules below;
1) Graphics
Regex: “^[_A-Za-z0-9]+$”;
Only latin unicode characters (a-z, A-Z and “_”)
Block: service names, object names and e SVFunctions
Other keywords:
“con”, “prn”, “aux”, “nul”, “com1”, “com2”, “com3”, “com4”, “com5”, “com6”, “com7”, “com8”, “com9”, “lpt1”, “lpt2”,
“lpt3”, “lpt4”, “lpt5”, “lpt6”, “lpt7”, “lpt8”, “lpt9”
“abstract”, “as”, “base”, “bool”, “break”, “byte”, “case”, “catch”, “char”, “checked”, “class”, “const”, “continue”,
“decimal”, “default”, “delegate”, “do”, “double”, “else”, “enum”, “event”, “explicit”, “extern”, “false”, “finally”,
“fixed”, “float”, “for”, “foreach”, “goto”, “if”, “implicit”, “in”, “int”, “interface”, “internal”, “is”, “lock”,
“long”, “namespace”, “new”, “null”, “object”, “operator”, “out”, “override”, “params”, “private”, “protected”,
“public”, “readonly”, “ref”, “return”, “sbyte”, “sealed”, “short”, “sizeof”, “stackalloc”, “static”, “string”,
“struct”, “switch”, “this”, “throw”, “true”, “try”, “typeof”, “uint”, “ulong”, “unchecked”, “unsafe”, “ushort”,
“using”, “virtual”, “void”, “volatile”, “while”
“apploader”, “initinstance”, “preload”, “base”, “iopl”, “private”, “code”, “library”, “protmode”, “conforming”, “loadoncall”,
“pure”, “data”, “longnames”, “readonly”, “description”, “movable”, “readwrite”, “dev386”, “moveable”, “realmode”, “discardable”,
“multiple”, “resident”, “dynamic”, “name”, “residentname”, “execute-only”, “newfiles”, “sections”, “executeonly”, “nodata”,
“segments”, “executeread”, “noiopl”, “shared”, “exetype”, “noname”, “single”, “exports”, “nonconforming”, “stacksize”, “fixed”,
“nondiscardable”, “stub”, “functions”, “none”, “version”, “heapsize”, “nonshared”, “windowapi”, “imports”, “notwindowcompat”,
“windowcompat”, “impure”, “objects”, “windows”, “include”, “old”
“window”, “title”, “width”, “height”, “width”, “top”, “left”
Regex: “^[_A-Za-z][_A-Za-z0-9]*$”
It is similar to the graphics, except it doesn’t allow numbers as the first character.
‘ ‘, ‘<‘, ‘>’, ‘?’, ‘/’, ‘\\’, ‘\”, ‘\”‘, ‘;’, ‘.’, ‘{‘, ‘}’, ‘(‘, ‘)’, ‘:’,
‘+’, ‘=’, ‘*’, ‘
Yes, you can. In ADISRA SmartView, the same tag can be linked to multiple Facts. Each RuleSet has
its own Fact document with a local scope, meaning the Facts defined there are specific to that
RuleSet. Additionally, there is a global Fact document that is accessible across all RuleSets. This
allows for flexibility in organizing and reusing Facts throughout your application.
Yes, you can configure ADISRA SmartView to automatically launch your project or even the Remote
Viewer each time Windows or Linux starts. This is especially useful for unattended systems or
industrial panels that must resume operation immediately after a reboot.
For detailed step-by-step instructions on configuring your ADISRA SmartView project to launch
automatically at Windows startup, check out the instructions here.
https://guides.adisra.com/kb/how-to-run-an-application-on-windows-startup/
On Linux
If you are running ADISRA SmartView on a headless, embedded Linux system, you can set it up to
automatically start your project at boot using a systemd service.
Here is how to do it:
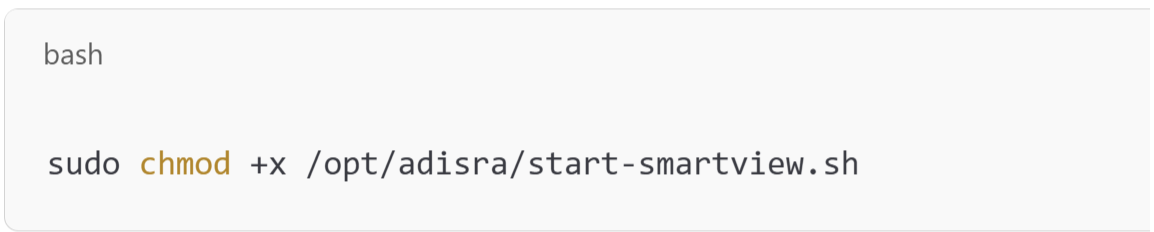
Step 1: Create a Shell Script to Launch the Runtime
1. Open a terminal and create a shell script:
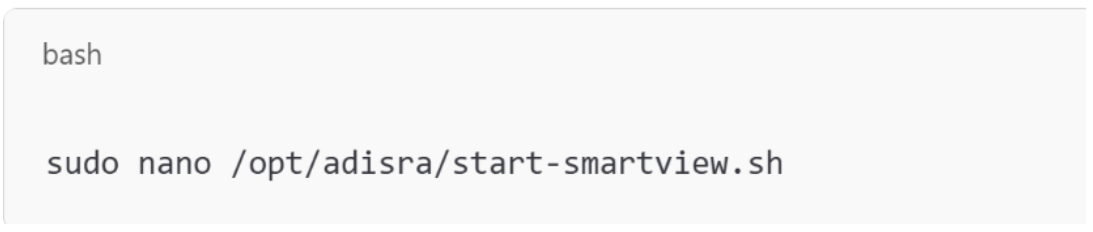
2. Add the following content to launch the runtime:
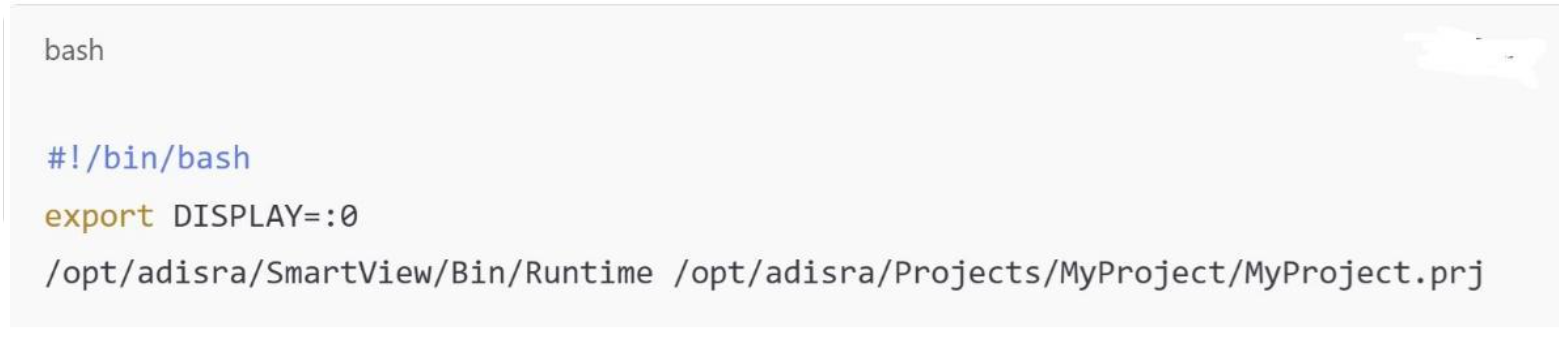
Replace the path to the Runtime executable and your .prj file as needed.
3. Make the script executable:
Step 2: Create a systemd Service
1. Create a new service file:

2. Paste the following content:
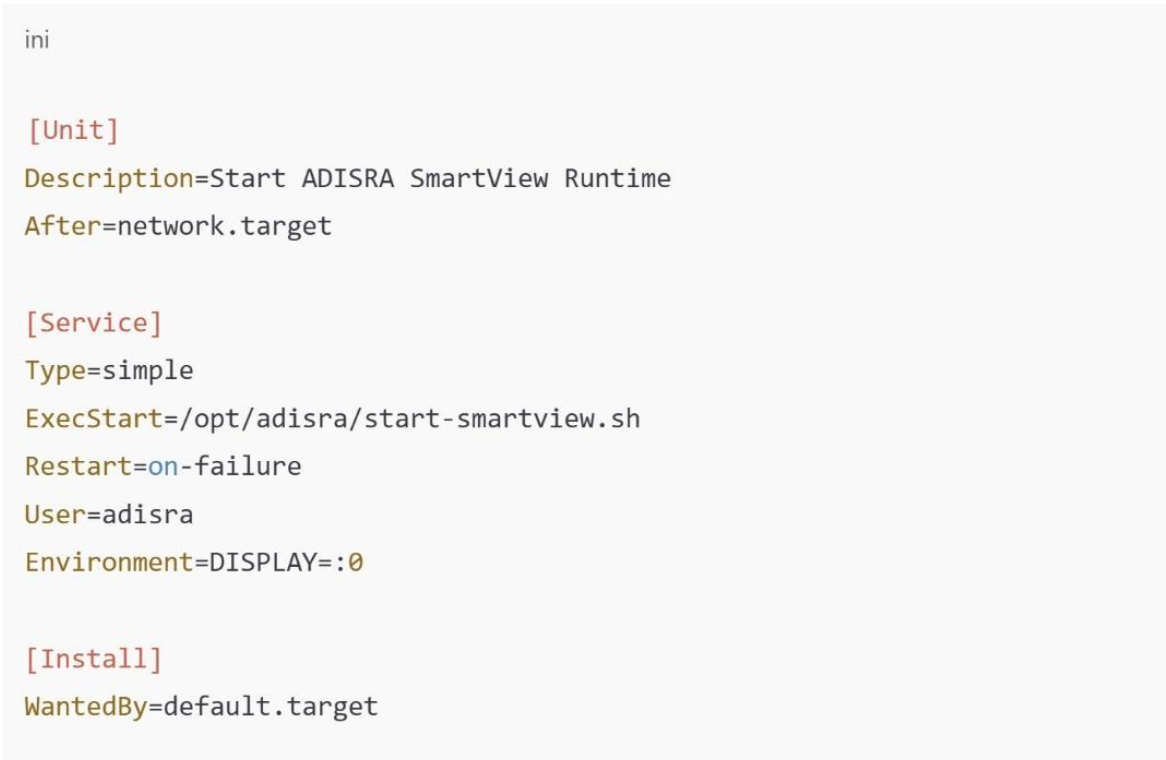
Make sure to change User=adisra to the correct Linux user running your X session.
If the project needs to run with graphical access, ensure it launches after the desktop environment
(e.g., graphical.target or use a display manager’s autostart).
Step 3: Enable the Service
Enable and start the service so it launches on boot:

Test It
Reboot your Linux system and check whether the project launches automatically:

After login, the ADISRA SmartView runtime should start and load your project.
Yes, ADISRA SmartView includes a built-in capability to export trend data. You can export any
selected time range to a file or database for further analysis, documentation, or reporting. This
functionality allows you to generate professional reports and retain historical data outside the
runtime environment, making it easier to share insights, track performance, or meet compliance
requirements.
When it comes to licensing, an upgrade is only required when there is a change in the first two
numbers of the version, known as the major and minor versions. Updates that only affect the
service pack or patch numbers do not require a license upgrade.
For example:
Version 4.1.3.0 consists of:
Major Version: 4
Minor Version: 1
Service Pack: 3
Patch: 0
See image below:
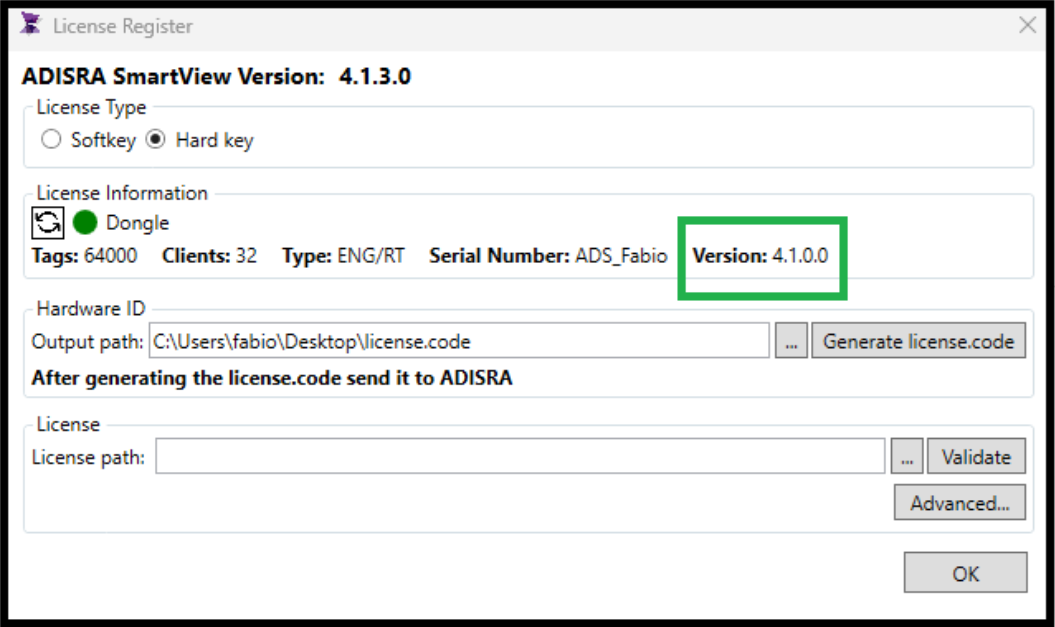
If you update from 4.1.3.0 to 4.1.4.0 (a new service pack), no license upgrade is needed, as long as
you already have a valid 4.1.x.x license. However, an upgrade to 4.2.0.0 would require a new license.
Yes, and here is how.
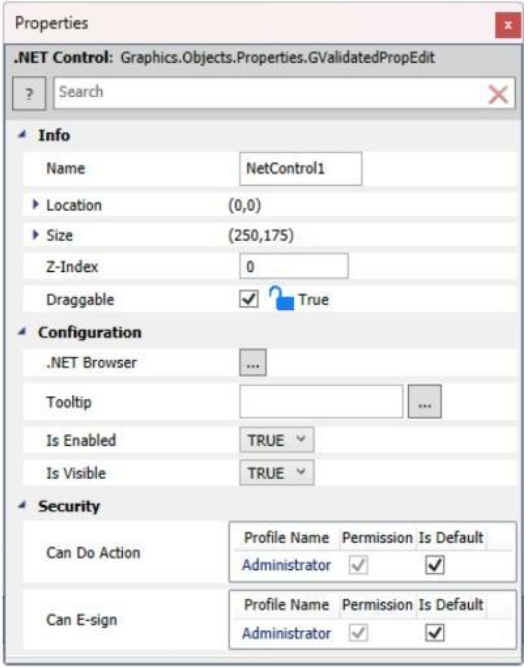
One of the features of ADISRA SmartView on Windows is its ability to host and run custom .NET controls directly within your HMI/SCADA screens. Suppose you are a developer or system integrator looking to extend the functionality of your automation application. This opens the door to a wide range of possibilities, from sleek visualization elements to specialized third-party libraries.
Because ADISRA SmartView acts as a .NET container, it allows you to:
- Embed custom .NET components like interactive charts, gauges, or enhanced input controls.
- Incorporate third-party libraries for functions like encryption, advanced reporting, or high-precision math.
- Reuse existing .NET code, avoiding time-consuming rewrites for another platform.
- Expand beyond traditional HMI/SCADA functionality by tailoring your solution for your needs.
How to Add a .NET Control in SmartView
It is easy to get started. Navigate to the Advanced Objects section and click the .NET Controls icon. This will open a dialog box with available options. Select the control you want and drop it into your graphic document.

Once placed, you can fine-tune the behavior of the control using the Properties tab.
A Note About Web and Cross-Platform Compatibility
Because the classic .NET Framework is designed specifically for Windows, these controls are best used in Windows-based runtime environments. If you need your screens to be web-accessible or run across platforms like Linux or macOS, we recommend using Template Objects instead.
Template Objects let you create reusable, cross-platform graphical elements from the native object library inside ADISRA SmartView. You can build them once in a Template Document, then reuse or customize them across multiple screens, ensuring both consistency and performance across different deployment targets.
ADISRA SmartView also includes a library of prebuilt templates, which can be added or modified to match your exact design and functionality requirements.
While our .NET integration leverages the traditional Windows-based .NET Framework, ADISRA SmartView also supports the more modern, cross-platform .NET (formerly .NET Core), enabling development that spans Windows, Linux, and macOS environments.
So whether you are embedding .NET controls for a Windows runtime or designing an application for the web, ADISRA SmartView gives you the flexibility to build the right solution for your industrial automation needs.
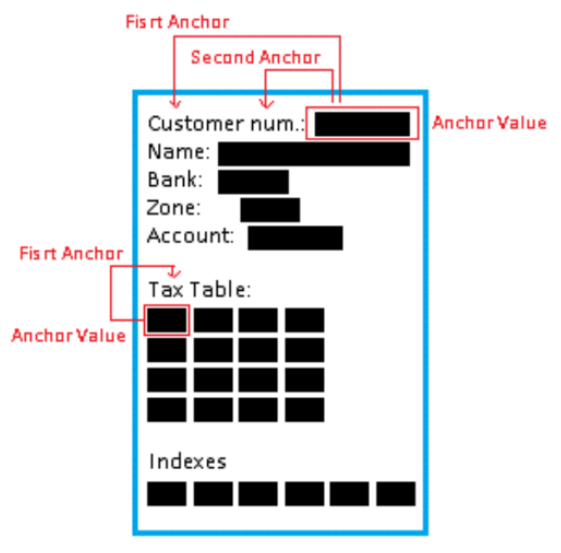
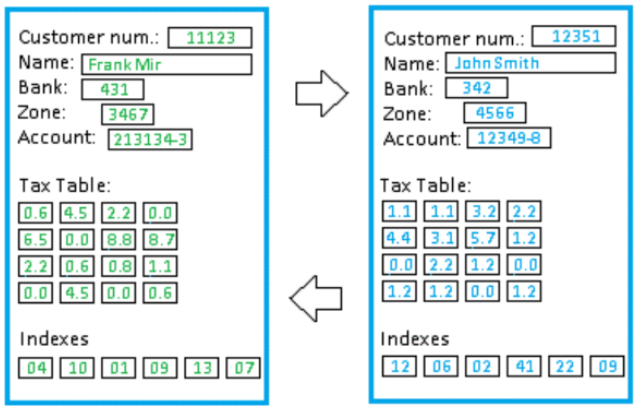
This is done through the concept of anchors:
First Anchor: Serves as the primary reference point to identify a specific group or section of data.
Second Anchor: Acts as a complement when multiple fields share the same initial anchor value,
helping differentiate between them.
Anchor Value: This is the actual value linked to a specific tag in your project. It can be modified or
transmitted based on recipe logic.
By using these anchors, Smart Recipes know precisely where to look (or write) within the text file,
ensuring precision in both sending and receiving data.
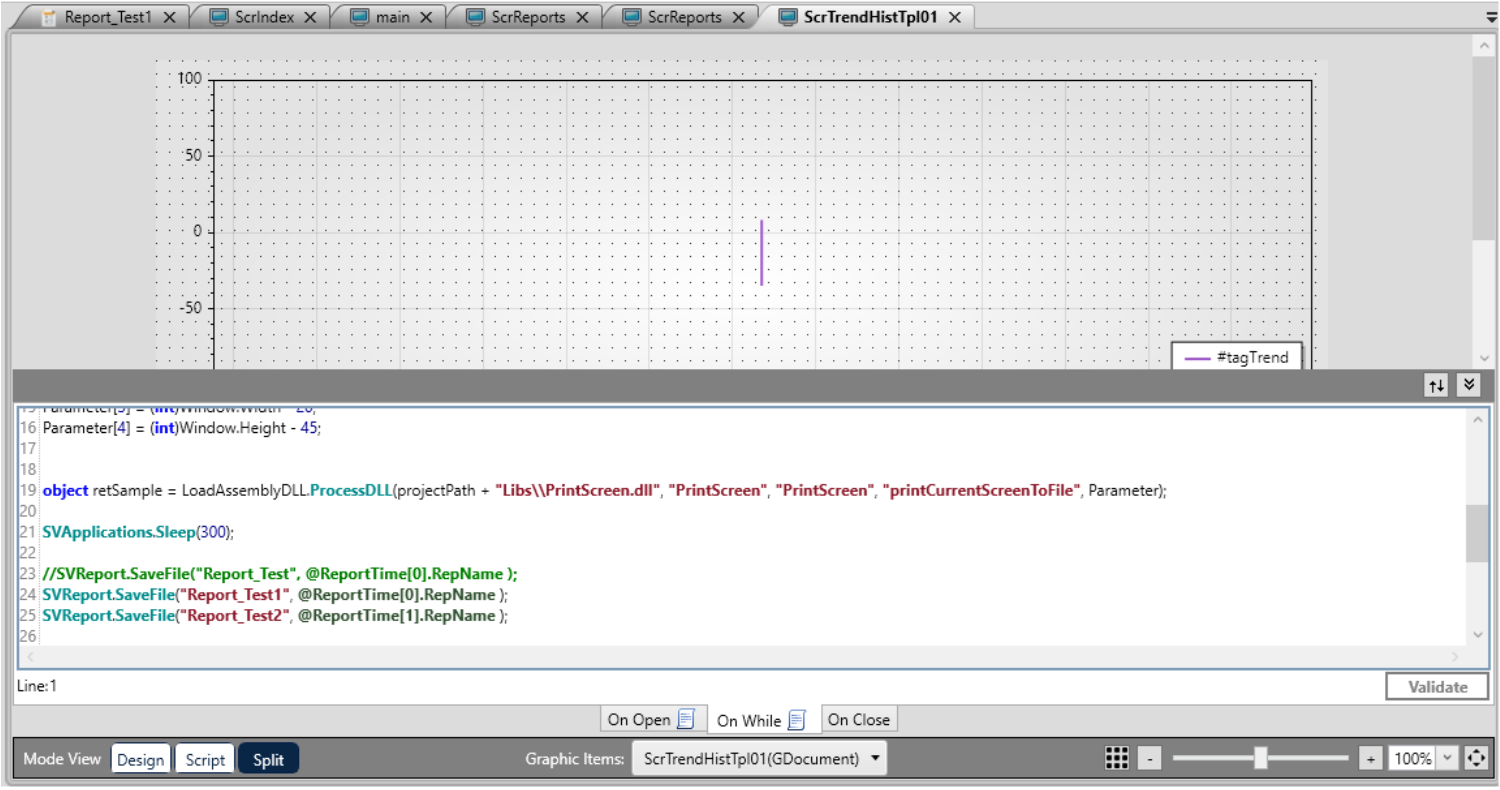
The GIF below demonstrates how to include a trend chart in a PDF report using our standard default
demo project.
https://drive.google.com/file/d/1zRM40TzLiM8EGkajXC64yEG5aXibnkW5/view?usp=drive_link
In this example, the screen contains a historical trend. When the "Create Report" button is clicked,
the application temporarily opens the trend screen and displays the selected tag. A screenshot of
the trend is then captured and saved to the project's image folder. Before the screen closes, a
report is generated using the saved image.
Below is the resulting report within ADISRA SmartView.
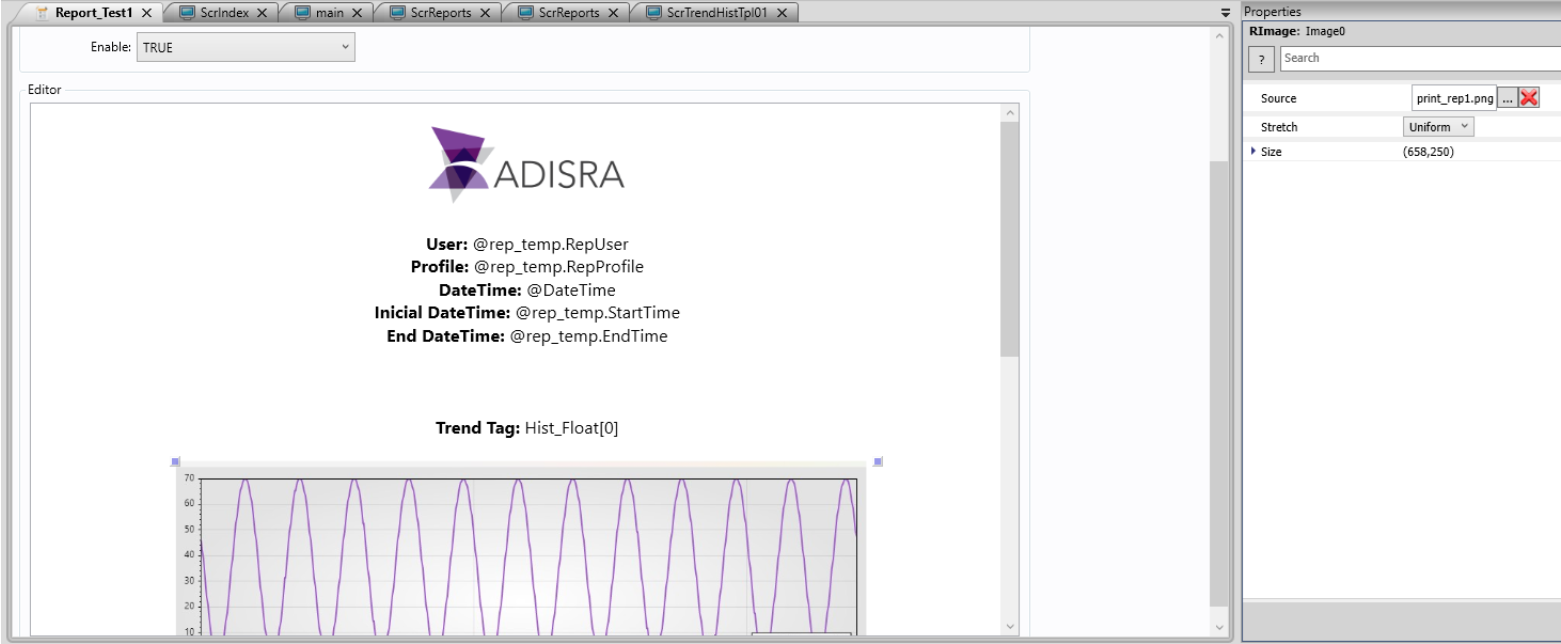
Below is the Trend screen used in the demo to capture the screenshot and generate the report.
This is just one example. Some clients prefer to place the "Generate Report" button directly on the
screen where the Trend is displayed. This approach allows users to adjust the time range or apply
filters, then generate a report based on precisely what is visible at the moment they click the button.
The screenshot function also supports passing specific coordinates (top, left, width, and height) to
capture only the desired portion of the screen.
Smart Recipes excels when used as a bridge between ADISRA SmartView and external applications.
For example, external software might read from a predefined text file. The Smart Recipe in ADISRA
SmartView can be configured to populate this file with real-time data, like customer information,
from your HMI system.
At the same time, that external software may write back updated values into the text file. Smart
Recipes can then load those new values, updating your tags and keeping everything synchronized.
Microsoft Windows Embedded CE 6.0 ended mainstream support on April 9th, 2013, ended extended support on April 10th, 2018, and will end product distribution through partners support on February 28th, 2022. Please find below the Microsoft website on the lifecycle of Windows Embedded CE 6.0 below.
https://docs.microsoft.com/en-us/lifecycle/products/windows-embedded-ce-60
Microsoft Windows Compact 7 mainstream support ended on April 12th, 2016 and the extended support ended on April 13th, 2021. However, product distribution does not end until February 28th, 2026. Please find below the Microsoft website on the lifecycle of Windows Embedded CE 7.0 below.
https://docs.microsoft.com/en-us/lifecycle/products/windows-embedded-compact-7
Microsoft is also encouraging customers to move from Windows CE to their latest operating systems. Please see below the link to their FAQ on migrating from Windows CE.
https://docs.microsoft.com/en-us/windows/iot-core/windows-ce-migration-faq
Because of the short life cycle of the Windows CE platform, ADISRA SmartView has chosen not to support this platform. If there is a high demand from our customer, we will reevaluate support for this platform.
Yes, you can use the .net library to open a pdf file with the following code inside the button click event:
string path = SVApplications.ProjectPath() +”Reports\\ReportDemoPDF.pdf”
System.Diagnostics.Process.Start(path);
In this example, it will open the ReportDemoPDF.pdf file which is located under Reports folder inside the project folder.
(i.e. C:\Users\admin\Documents\ADISRA SmartView\DemoApplication\Reports\ReportDemoPDF.pdf)
You can also use the same Process.Start() function to execute any external software.
Please refer to the following link for further information:
https://docs.microsoft.com/en-us/dotnet/api/system.diagnostics.process.start?view=net-5.0
Yes, you can use an expression in the text property of a label as in the image below:
You can use the template object, and reuse it as many times as you need. The template object will define internal object tags where you can display the variables that represent that system and you can also create any type of animation. As soon as you finish the template object, it is possible to add it as many times as you want and when configuring each one of them, you will be able to configure the tags that represent that specific system. With templates you can also export and reuse in a different project in case you need it in a future project.
Yes, after creating the driver’s communication and setting the tag that will receive the updates from the PLC, you can create a Tag’s History spreadsheet and add that tag to it. You can still choose from saving the information in the internal database (proprietary) or an external relational database. If you choose the external database, you just need to create a Database Connection first in the Top Ribbon under Settings:
![]()
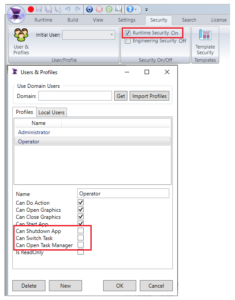
Yes, just enable the runtime security and configure a profile removing the permissions as in the image below:
How to Run Two Versions of ADISRA SmartView on the Same Machine
Yes, you may have multiple ADISRA SmartViews on the same machine. For example, you might want
to maintain an older project while testing a newer release. This can be done by following the steps
below:
Access the Installed Version's Directory
If ADISRA SmartView version XX is installed, locate its installation folder by right-clicking the desktop
shortcut and selecting “Open file location.”
Duplicate the Runtime Folder
Inside the ADISRA SmartView installation directory, find the folder named "Bin".
Copy and paste this folder in the same directory.
Rename the copied folder to something descriptive like Bin_4_0_4_0_Patch3.
This allows you to preserve the runtime environment of a specific version, even if you install a newer
release later. By launching ADISRA SmartView from the copied Bin folder, you can maintain
compatibility and test across versions without conflict.
Create Separate Shortcuts for Each Version
To easily launch different versions:
Open the newly renamed Bin_4_0_4_0_Patch3 folder.
Right-click on IDE.exe (the development environment) or Runtime.exe (for direct project execution).
Select "Create Shortcut"
Move the shortcut to your desktop or taskbar and rename it (e.g., SmartView 4.0 Patch 3).
Repeat this process for other versions you install. This allows you to launch a specific version directly
without interfering with the others.
Bonus Tip: Managing Projects Across Versions
If you are switching between versions, be mindful of project compatibility. Opening a project in a
newer version may alter its structure, making it incompatible with older versions. Always back up
your project before switching versions.
Inserting Facts into a Rule Set is not mandatory in ADISRA SmartView. Depending on the application,
rules can operate directly on application tags. However, Facts are beneficial when working with
multiple data entries, such as a list of employees from a database or a collection of tags within
ADISRA SmartView.
For example, you might have array tags, like @PumpFlow and @PumpVibration, that you define in
the tag list. You can choose to apply a rule to each tag in the array individually (using
applicationTags) or you can simplify the process by associating a #Fact with the entire array of tags
and creating one single rule. The rule engine will make sure all the instances of the array tag will be
loaded and tested in the rules
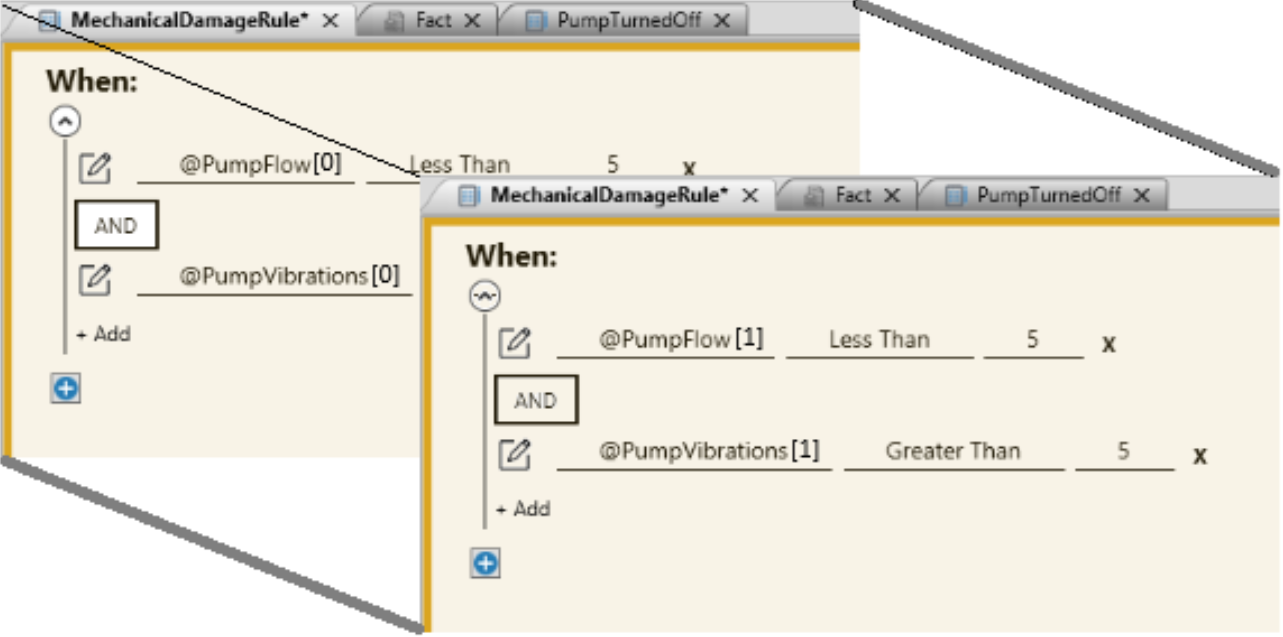
Graphic of multiple rules to evaluate two application array tags (PumpFlow[] and PumpVibration[]).
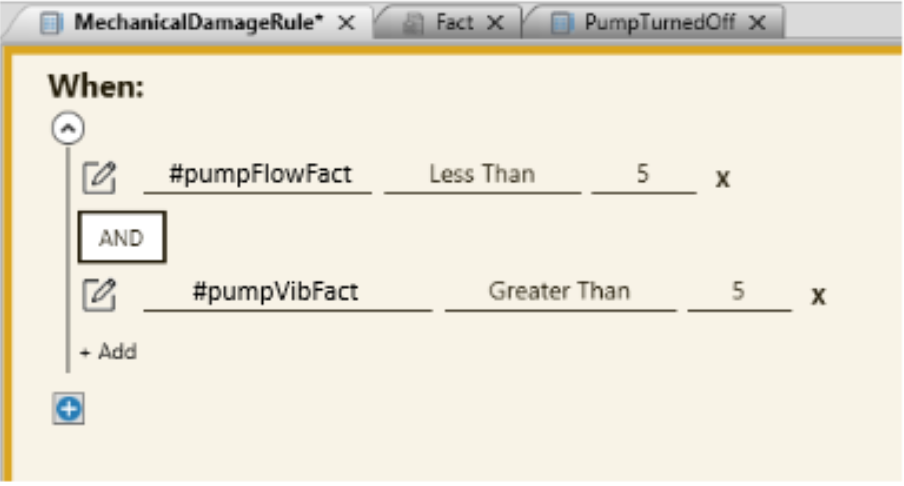
Graphics of a single rule to evaluate the entire array tag using a Fact.
Both methods are supported in ADISRA SmartView, but using a Fact linked to an array is more
efficient. Instead of manually referencing each element, such as @Tag1[0], @Tag1[1], @Tag1[2],
etc., you only need to configure the Fact once. The rule engine will automatically iterate through all
elements in the array during execution.
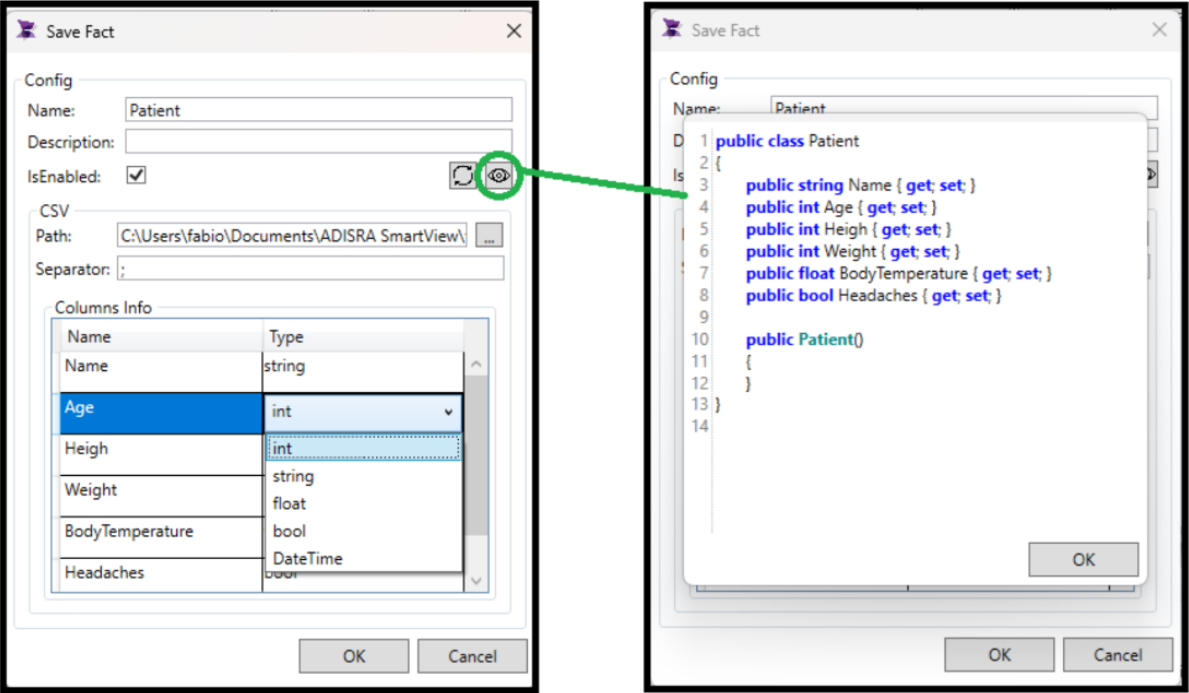
Before assigning a CSV file to a Fact in ADISRA SmartView, the file must include a header row.
Once the CSV file is selected, its columns will be available for use when configuring rule conditions.
By default, all columns are treated as strings. If any of the fields are used in rule conditionsfor
example, to perform numeric comparisons—it is important to update their data types accordingly.
To change a column’s data type, simply click on the Type cell for that column and select the
appropriate type. In this new example of a patient, the BodyTemperature field is used in a rule that
compares numeric values, so its type is set to Float.
Users can also verify the Fact's internal code by clicking the highlighted button shown below. Be
sure to review the generated class carefully to ensure it has been created correctly.
Yes, absolutely! ADISRA SmartView Runtime runs seamlessly on both Linux and Windows, giving
you flexibility in how and where you deploy your applications.
The runtime environment, known as RunTimeLnx, supports a wide range of popular Linux
distributions, including:- - Ubuntu
- Mint
- CentOS
- Debian
- Alpine
And many more.
How It Works
ADISRA SmartView is structured into three main components:
Development Environment – This runs exclusively on Windows. It is where you design and configure
your application.
Runtime – This can run on Linux or Windows, depending on your deployment environment.
Viewer – Available in Local Viewer, Remote Client, and Web Client formats, it allows you to interact
with your project from any device.
Deploying to Linux – Step-by-Step
- Develop on Windows: Use the ADISRA SmartView Engineering Environment to build your
application.
- Save as HTML5: Before transferring, save the project in HTML5 format to ensure compatibility with
the Linux Runtime.
- Transfer the Application: Make sure your Linux machine is on the same network as your Windows
development system. Then use the Remote Management Tool to seamlessly transfer files to the
Linux box.
- Run Locally or Remotely: The Linux Runtime supports both:
- Remote Viewer connections via port 9002
- Web Viewer connections via port 9003
Note: You will need Apache installed to serve pages for either viewer type, whether accessed locally
or remotely.
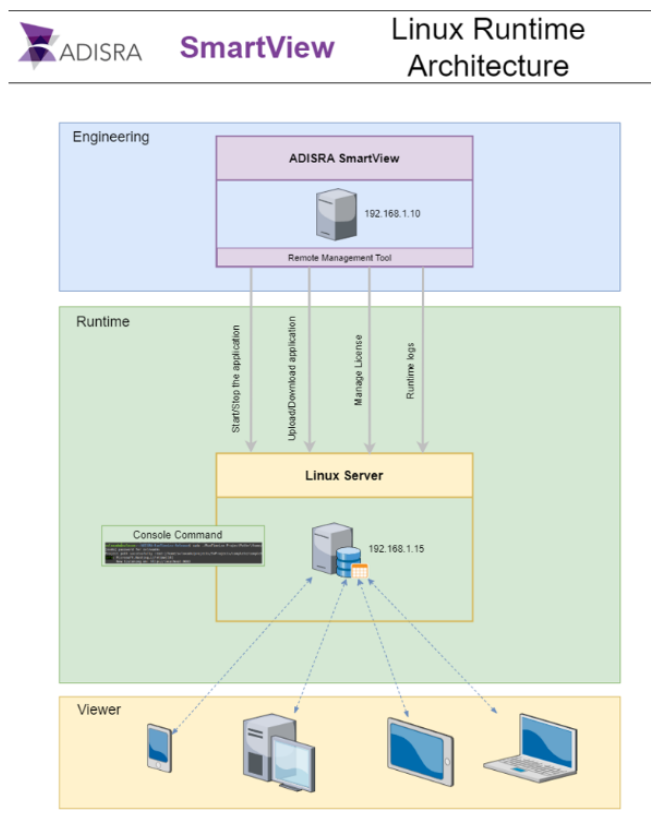
The image above illustrates the three process levels of ADISRA SmartView. The first block represents
the Engineering Development Environment, which runs exclusively on Windows. This environment
includes the Remote Management Tool, designed to manage ADISRA SmartView Runtime
installations, whether on Windows or Linux.
Once ADISRA SmartView Runtime is installed and the Remote Management Tool Service is running
on the Linux system, you can connect to it directly from the Engineering Environment. This allows
you to license the Runtime, transfer applications, and start or stop the runtime process—all from a
single, centralized interface.
Remote Management Made Easy
ADISRA SmartView includes a powerful Remote Management Tool that works on both Windows and
Linux. Built on .NET 6, this tool allows you to:
- Upload/download applications
- Start/stop the runtime remotely
- Manage runtime logs
- Handle licensing—all without needing physical access to the Linux machine
Just make sure your operating system supports .NET 6, and you are good to go.
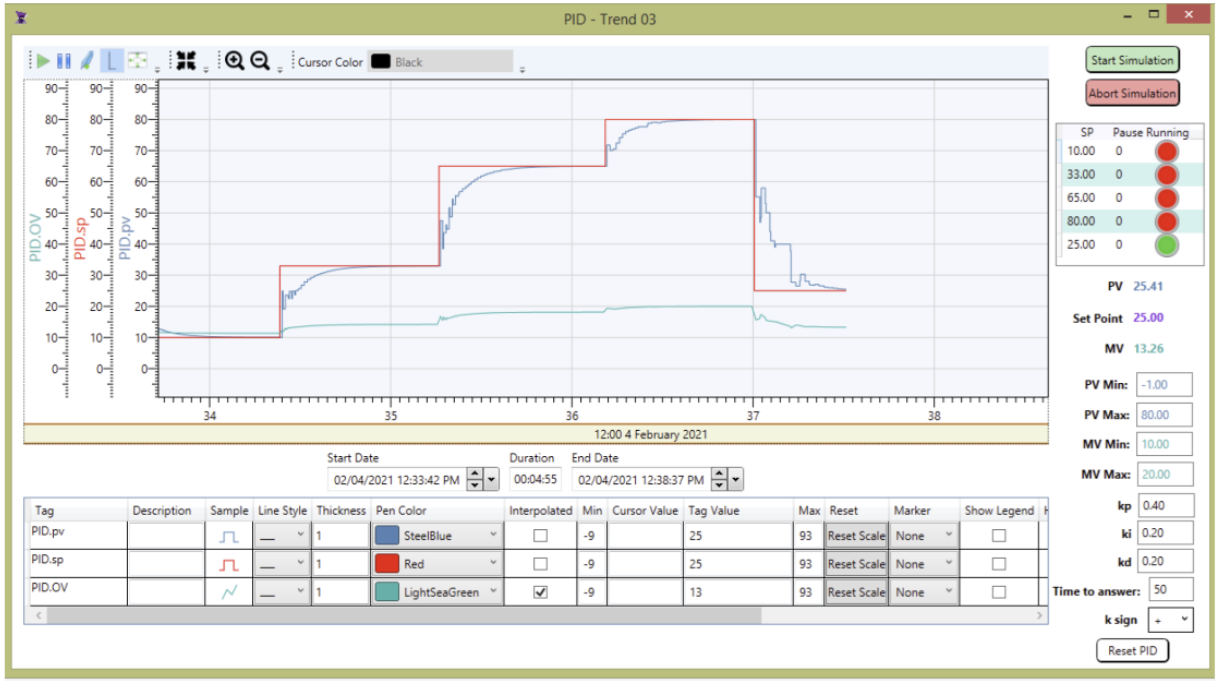
The ADISRA SmartView trend object is used to display the historical data of one or more tags over
a certain period of time. The user also has the option to edit how the information is displayed by
editing the plot line style, the period of time the object is displaying, zooming in, and so much more.
Trends in ADISRA SmartView are continuously evolving to meet the demands of modern industrial
applications. As of the current version, ADISRA SmartView offers a rich set of trend visualization tools
designed for flexibility, usability, and advanced data analysis.
Here’s a breakdown of the key features currently available:
- Customizable Background: Easily set background color and style for better readability or branding.
- Dynamic Pens: Add or remove pens (data lines) dynamically during Runtime or configure them
ahead of time.
- Multiple Scales: Use one or more Y-axis scales for different data sets.
- Flexible Line Styling: Configure line color, style, and thickness for each pen.
- Timestamp Configuration: Display or hide the timestamp area and define initial start and end dates.
- Toolbar Controls: Includes interactive tools like Run/Stop, Zoom In/Out—each of which can be
shown or hidden.
- SPC (Statistical Process Control) Options: Calculate and display Max, Min, Average, and Standard
Deviation directly within the trend.
- Data Source Flexibility: Trends can pull data from various sources, including CSV files and databases,
giving you the ability to visualize historical or real-time information.
You can check out a Trend demo on our website here: https://adisra.com/adisra-example-features/
that shows how to dynamically add pens to a Trend object using scripts. The scripting feature gives
you full control over pen configuration, including line thickness, color, marker style, Statistical
Process Control (SPC) options, legend visibility, and interpolation methods, making it easy to
customize trends to fit your application’s needs.
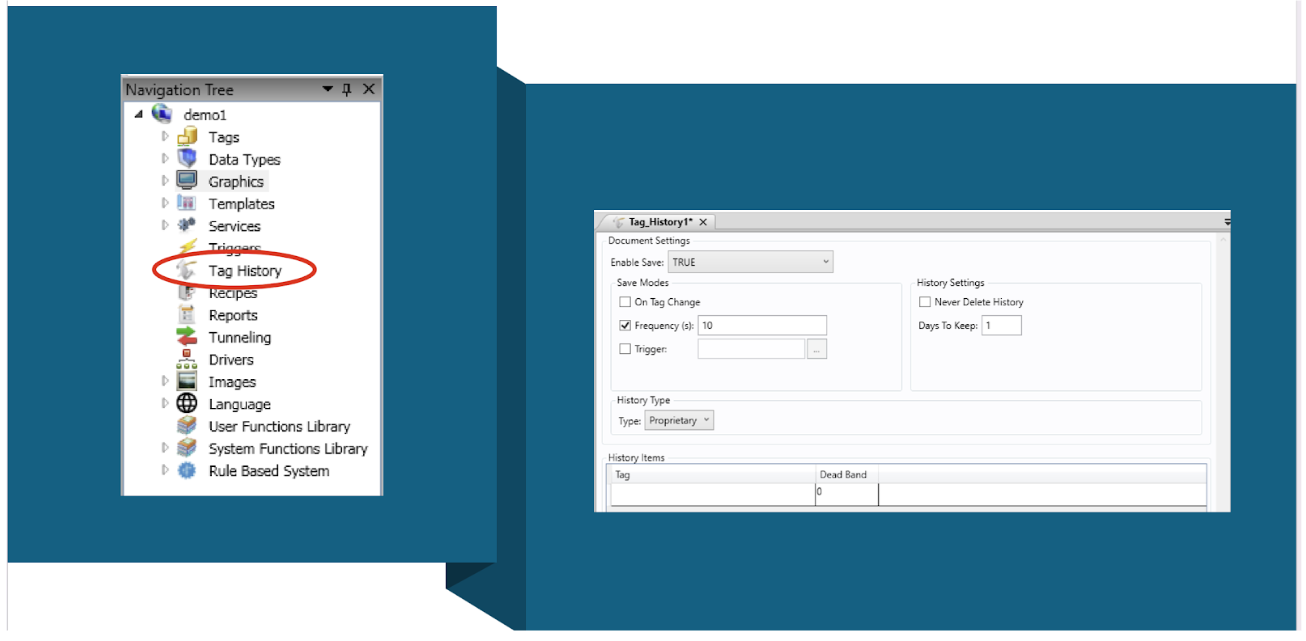
The Tag History feature in ADISRA SmartView enables you to store and analyze historical data
from your project’s tags, essential for building trend charts, generating reports, and gaining deeper
insights into system performance over time. This historical data becomes even more powerful when
combined with ADISRA SmartView’s rule-based expert system, allowing you to analyze machine
behavior and process efficiency to support smarter, data-driven decisions.
In the Engineering Environment, Tag History is managed through Tag History Documents, which are
located in the Tag History folder within the Navigation Tree. These documents define which tags will
be logged and how that data will be stored.
Here’s how it works:
- You can create one or more Tag History Documents in a project.
- Each document can have its own storage settings, such as:
- Storage method: proprietary file format or external database
-Retention policy: how long to keep the data
- Storage trigger: store on a schedule (time-based), when a tag changes, or based on a
custom trigger
- Important: A tag can only belong to one Tag History Document, so you’ll want to group tags
based on similar storage needs.
In the main section of each Tag History Document, you define:
- The list of tags to be stored
- An optional deadband value, which filters out small or insignificant changes when using the “store
on tag change” method. This helps reduce unnecessary data storage.
By thoughtfully organizing your tags and configuring the right storage method, you can ensure that
your system captures the data you need without overwhelming storage resources.
This feature makes it easy to build historical trends, perform diagnostics, and support long-term
analysis, critical for any modern industrial automation system.
A Smart Recipe is a versatile engine designed to load and save values within a structured text
document. These values are anchored to application tags, enabling the dynamic exchange of data
between your HMI/SCADA project and external systems. Each value can be linked, stored, and
retrieved based on anchors and tag associations. It is similar to having a form that is populated by
external data.
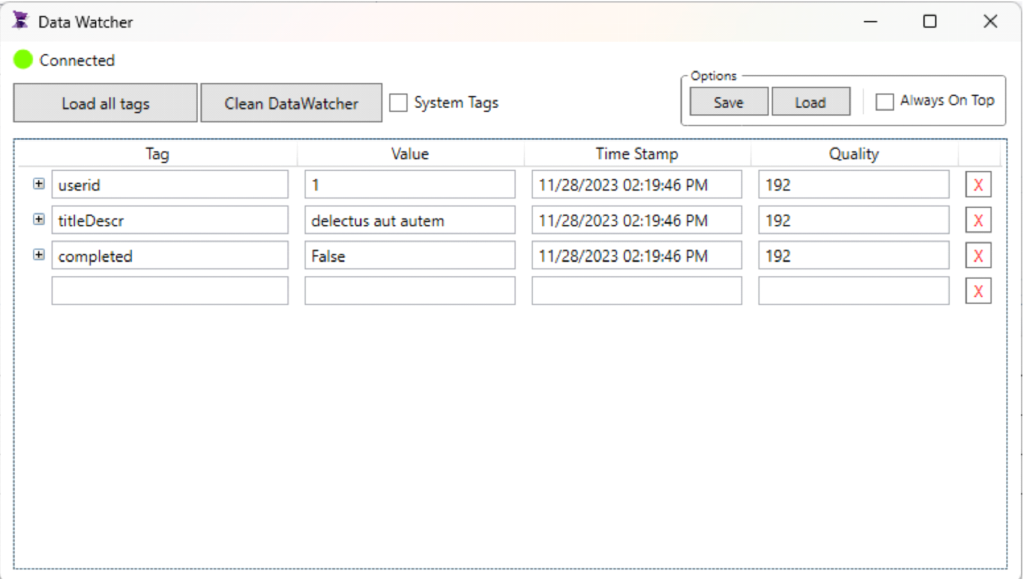
The Data Watcher is a diagnostic tool in ADISRA SmartView that lets you monitor tag values and
update them in real time, but only while the project is running in Runtime mode. It is especially
helpful for testing and debugging live data, verifying tag behavior, and adjusting values on the fly.
The Data Watcher tool is found in the Runtime tab of the header ribbon in ADISRA SmartView.
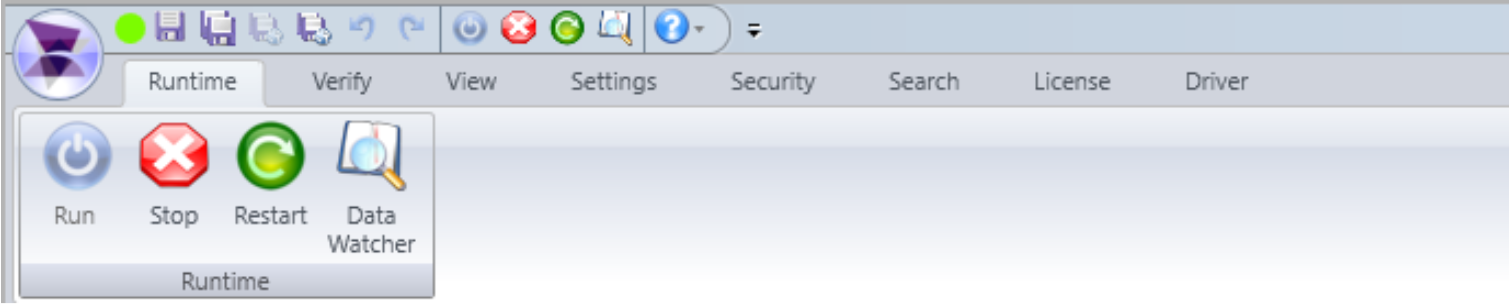
Here are some of the functions:
- Connected: Indicates the Data Watcher is successfully connected to the Runtime.
- Disconnected: Appears when the Data Watcher is not connected, make sure your project is running
in Runtime mode before attempting to use this tool.
- Load All Tags: Displays all project tags and key properties. You can also manually enter tag names
line by line.
- Clean Data Watcher: Clears the current tag list from the display (but does not delete any tags from
the actual project).
- System Tags Checkbox: Toggle this on to view built-in system tags and their respective
functionalities.
- Save Button: Export the current list of visible tags to a .csv file for documentation or reuse.
- Load Button: Import a predefined list of tags from a .csv file to quickly populate the watcher.
- Always on Top Checkbox: Keeps the Data Watcher window visible above all other windows, which
can be handy for live debugging.
- Graphic Button (Trash Icon): Removes the selected tag from the Data Watcher table (again, not
from the project itself).
ADISRA allows you to display your application at runtime through the ADISRA SmartView Viewer
(locally and remotely) and on commonly used web browsers. This can be achieved by using the
ADISRA SmartView web viewer, which is configured to allow the project to be executed as HTTP or
HTTPS.
Here’s how it works:
ADISRA SmartView converts your graphic screens into HTML5 and Java files, which can then be
hosted on a web server. This enables users on the same network or even across the internet to view
and interact with your application using a standard browser on a PC, tablet, or smartphone.
Web Deployment Workflow
1- Install a Web Server
Microsoft has many resources available at their website (https://learn.microsoft.com/en-us/) on
how to install Microsoft IIS Windows Web Server, and the same for Apache Tomcat Web server
(https://tomcat.apache.org/tomcat-8.5-doc/setup.html). Also, ADISRA has a whitepaper on
deploying your application on the web using Microsoft IIS Windows Web Server located here
(https://adisra.com/wp-content/uploads/2023/11/Web-Guide-V1.1.pdf).
2- Configure Web Server Location in ADISRA SmartView
In the ADISRA SmartView development environment:
Go to Settings > Web
Specify the internal port for data exchange between the web client and the runtime server and
confirm the folder where the HTML files will be saved, as shown below.

3- Export Graphics as HTML
Right-click the Graphics document in your project
Select "Save HTML."
This action generates HTML pages for each screen in your application.

4- View on Browser
Once published, you can access your application on any web browser pointed to your web server’s IP
and port.
ADISRA provides a helpful video walkthrough on how to publish your project to the web. Watch the
Setup Video here.
(https://www.youtube.com/watch?v=lUx3XOzAgEI&t=3s)
We have also put together a step-by-step whitepaper on publishing your project using Microsoft IIS.
Read the Web Deployment Guide
(https://adisra.com/wp-content/uploads/2023/11/Web-Guide-V1.1.pdf)
With this setup, your ADISRA SmartView application is ready to run anywhere, without sacrificing the
features of a desktop HMI. Whether you are supporting remote operators, mobile users, or simply
aiming to modernize your deployment, this browser-based approach makes it easy.
The “Disconnected” status in the Data Watcher means it is not currently connected to the
Runtime, and therefore cannot monitor or update tag values in real time. This typically occurs in the
following situations:
The project is not running in Runtime mode
There is a temporary communication delay or internal issue
The Runtime was stopped or restarted, and the Data Watcher wasn’t refreshed
To resolve this, make sure your project is running in Runtime mode. Then, reopen or refresh the
Data Watcher. Once connected, the status should change to “Connected”, allowing you to monitor
and interact with live tag data.
In addition to the connection status, you can also track the quality of tag communication using the
Data Watcher. Each tag displays a numeric quality code to help identify specific issues:
0 – Communication error between the tag and Viewer Runtime
4 – Tag is not correctly configured in the driver document
8 – Tag cannot connect to the assigned driver
65 – Tag value is below the defined minimum limit
66 – Tag value is above the defined maximum limit
192 – Normal communication; tag is operating correctly
These indicators are essential for diagnosing data flow issues and ensuring your project is running as
expected.
See the picture below:

The dashes are displayed whenever the tag's quality is compromised. You can monitor the tag's
quality status using the DataWatcher. We discussed the DataWatcher in a previous blog, which you
can read here.
You have the option to disable the dashes and instead display the last valid value before the tag's
quality was compromised. This setting can be adjusted in the tag document when a specific tag is
selected.
ADISRA SmartView includes a Web API driver designed to connect with external REST API servers. Web APIs enable communication between web servers, browsers, and applications over the internet. Among the different API architectures, REST (Representational State Transfer) is the most widely adopted due to its simplicity and scalability.
REST was introduced by Roy Fielding in his 2000 doctoral dissertation, where he outlined principles for building networked applications that leverage the architecture of the web. These principles emphasize stateless communication and the use of standard HTTP methods such as GET, POST, PUT, and DELETE to interact with resources.
According to IMARC (“Transforming Ideas into Impact”), RESTful APIs hold the largest market share in the U.S. at 55.75%, thanks to their scalability, simplicity, and compatibility with modern web services and cloud applications.
Why JSON is the Standard for REST APIs
The ADISRA SmartView Web API driver expects a JSON response from the REST API server. While REST APIs can technically return other formats (XML, CSV, plain text, or binary), JSON has become the de facto standard because:
- Request–Response model: A client (application or browser) sends an HTTP request (GET, POST, PUT, DELETE), and the REST API server responds with data.
- Lightweight and universal: JSON is human-readable, compact, and supported by nearly all programming languages.
- Consistency: Returning structured JSON ensures easy parsing, validation, and integration into applications.
Getting Started with the Web API Driver in ADISRA SmartView – A Simple Example
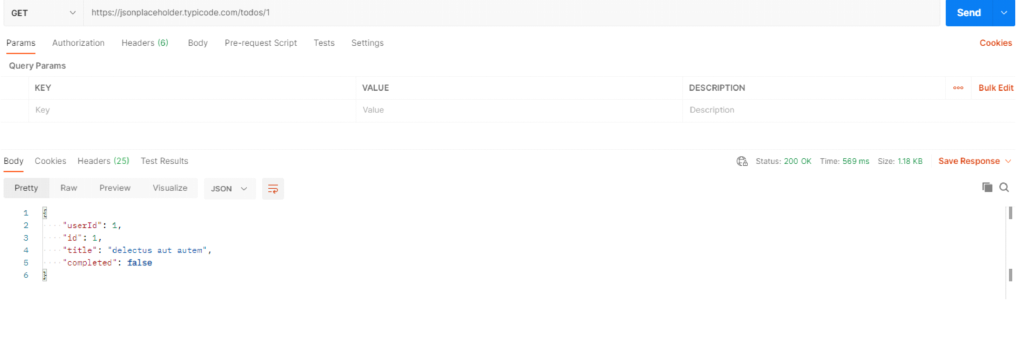
In this example, we’ll configure the Web API driver to retrieve information from an online open server. The default URL is already set, so we will keep it.
1- Create a Web API Document
Start by creating a new Web API document in SmartView.
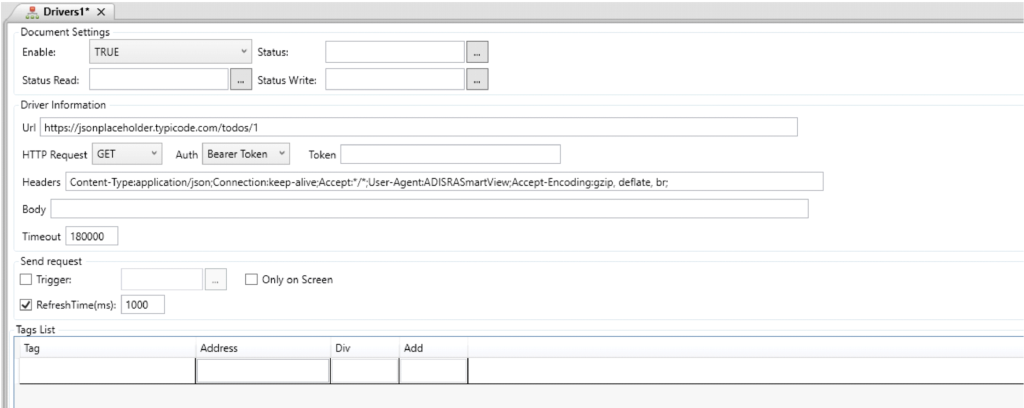
2- Configure the Document
Define the addresses and map them to tags in the Tag List. The addresses must match the JSON response format.
You can preview the JSON response directly in SFIDTS SmartView or use tools like Postman to test communication before specifying addresses.
Example: JSON properties can include coordinates, weather conditions, or other data arrays.
Always ensure that the addresses you configure in ADISRA SmartView match the exact JSON property names.
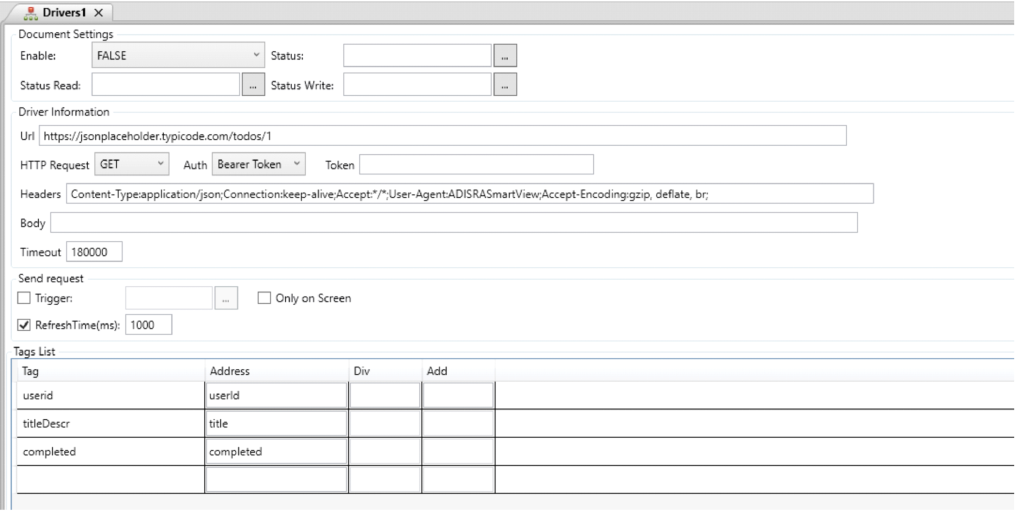
3- Run and Validate
Save the driver document and run the application. Use DataWatcher to confirm that the tag values are correctly retrieved from the JSON response.
This structured approach enables ADISRA SmartView users to seamlessly integrate RESTful APIs into their applications, allowing for real-time data retrieval from external web services.
As the digital landscape continues to evolve, APIs remain critical for connecting applications and driving innovation. For developers and anyone curious about how modern digital services operate, understanding Web APIs and the principles of REST is no longer optional; it is essential.

ADISRA SmartView operates as both an OPC UA Server and Client. As a server, it enables other applications to connect and read or write tag data. As a client, it can seamlessly access data from external OPC UA servers, including flow meters, temperature sensors, PLCs, and other devices.
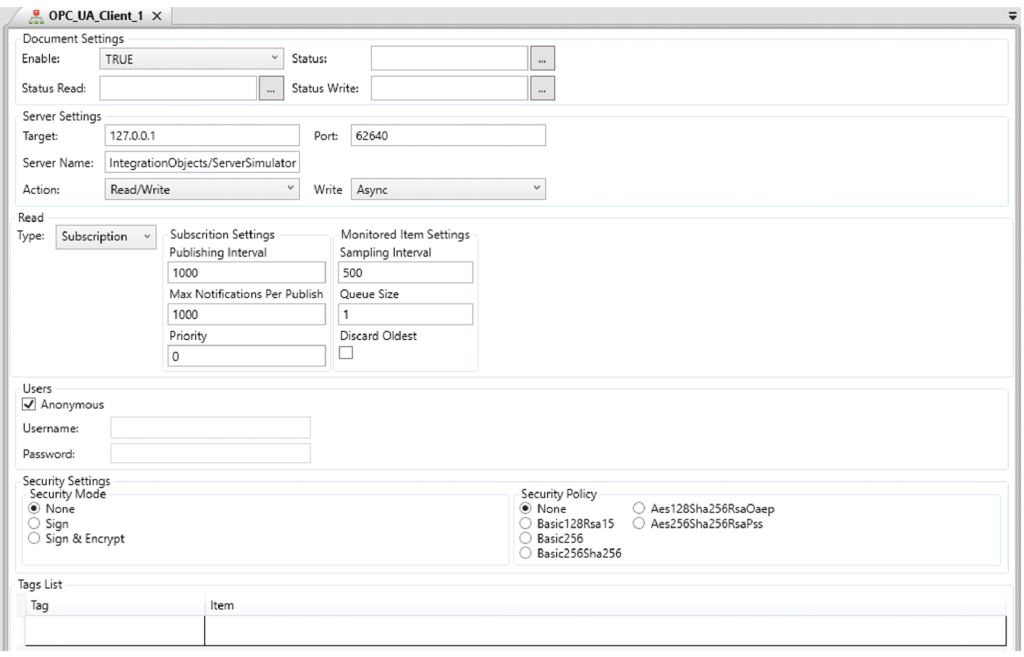
This dual capability allows ADISRA SmartView to integrate easily with OPC UA Servers for real-time data exchange. By configuring ADISRA SmartView as a client, users can establish communication with the server and define which tags will participate in the data exchange, providing precise control and flexibility in managing information flow.
On our website and YouTube channel, we share a video tutorial on how to configure the OPC UA Server in ADISRA SmartView. You can watch it here.

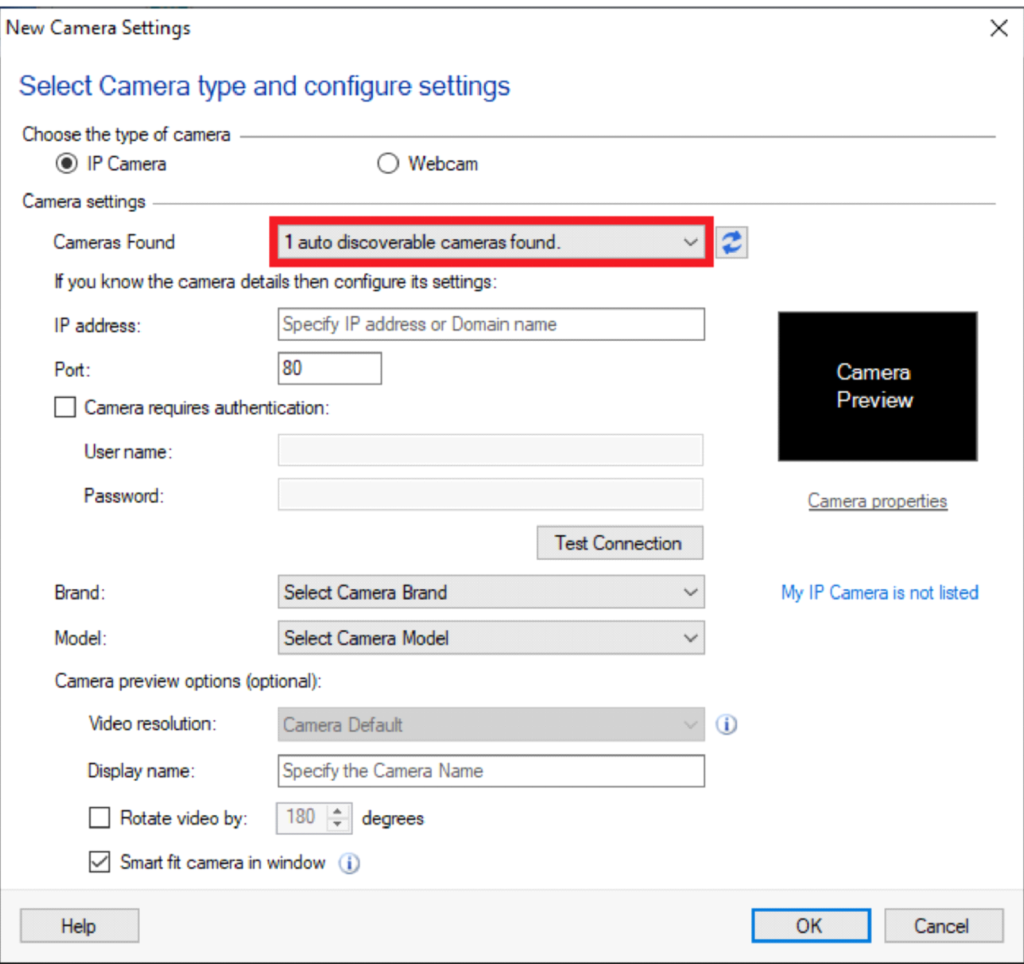
Yes. ADISRA SmartView can configure a graphic document to display a camera's video in real-time in the Viewer using the RTSP (Real Time Streaming Protocol). Within the ADISRA SmartView, you simply enter the camera’s RTSP address in the “URL to open” property. The address typically follows this format:
rtsp://[USERNAME]:[PASSWORD]@[IP_ADDRESS]:[RTSP_PORT][CHANNEL][STREAM_TYPE]
Example:
rtsp://admin:12345@192.168.1.100:554/Streaming/Channels/101
In this example, 'admin' is the username, '12345' is the password, '192.168.1.100' is the camera’s IP address, '554' is the RTSP port, and 'Channels/101' specifies the stream path.
RTSP is a network protocol designed to control interactive streaming media. It manages playback functions such as play, pause, stop, rewind, and fast forward, while RTP (Real-time Transport Protocol) handles the actual streaming of the video data. RTSP is widely used in IP surveillance systems, live broadcasts, and video-on-demand applications. Originally standardized in 1998 (RFC 2326) and later updated with RTSP 2.0 in 2016, it remains a key protocol for real-time video streaming.
In addition to RTSP, many IP cameras, such as Cognex vision systems, support protocols like Modbus TCP/IP. RTSP is best suited when the primary goal is streaming live video, while Modbus TCP/IP is typically used when you need structured data exchange (such as inspection results, triggers, or measurement values) alongside or instead of video. ADISRA SmartView can handle both, giving users the flexibility to visualize live images and integrate operational data from the same device.
ADISRA SmartView then visualizes this information on the user interface using a .NET control, which can even display live images from the vision camera directly on the screen.
By leveraging RTSP and ADISRA SmartView’s flexible integration capabilities, users can build tailored solutions for real-time monitoring, live streaming, video surveillance, and video-on-demand platforms.
We have published a comprehensive blog that explores the use of video in ADISRA SmartView. You can read it here.

With recent enhancements, alarms in ADISRA SmartView have become more flexible, supporting the development of robust and customizable application designs. Alarms can now be defined not only by threshold values but also by lists or enumerations, enabling greater precision in state-based monitoring. For example, a tag value of 1 might represent a low alarm, while a value of 2 corresponds to a high alarm. Users can assign custom priorities, apply advanced logic, and tailor alarm behavior to meet the exact requirements of their processes.
Key Features
Expanded Alarm Types
In addition to traditional alarms (e.g., high, low, deviation), ADISRA SmartView supports Enumeration/List/Multiple alarms. These allow triggering based on specific tag values mapped to defined conditions.
Custom Alarm Logic
Alarms can be configured from a list of tag values. For example:
Value 0 → Normalized (no alarm)
Value 1 → High Alarm
Value 2 → Freeze Alarm
Value 3 → Emergency Activated Alarm
This approach provides fine-grained monitoring for complex, state-based conditions.
Priority and Severity Control
Flexible assignment of alarm priority and severity enables operators to respond appropriately while supporting more granular alarm management strategies.
Integration with External Systems
Enumeration alarms are particularly useful when integrating with external systems that represent alarms in different ways. Each enumerated value can be assigned a custom message, displayed in the alarm object, and stored in the database alongside traditional alarms. This ensures both internal and external events are captured, visualized, and managed consistently.
We provide an example on our website that demonstrates how to filter alarms by tag name. You can view it here.
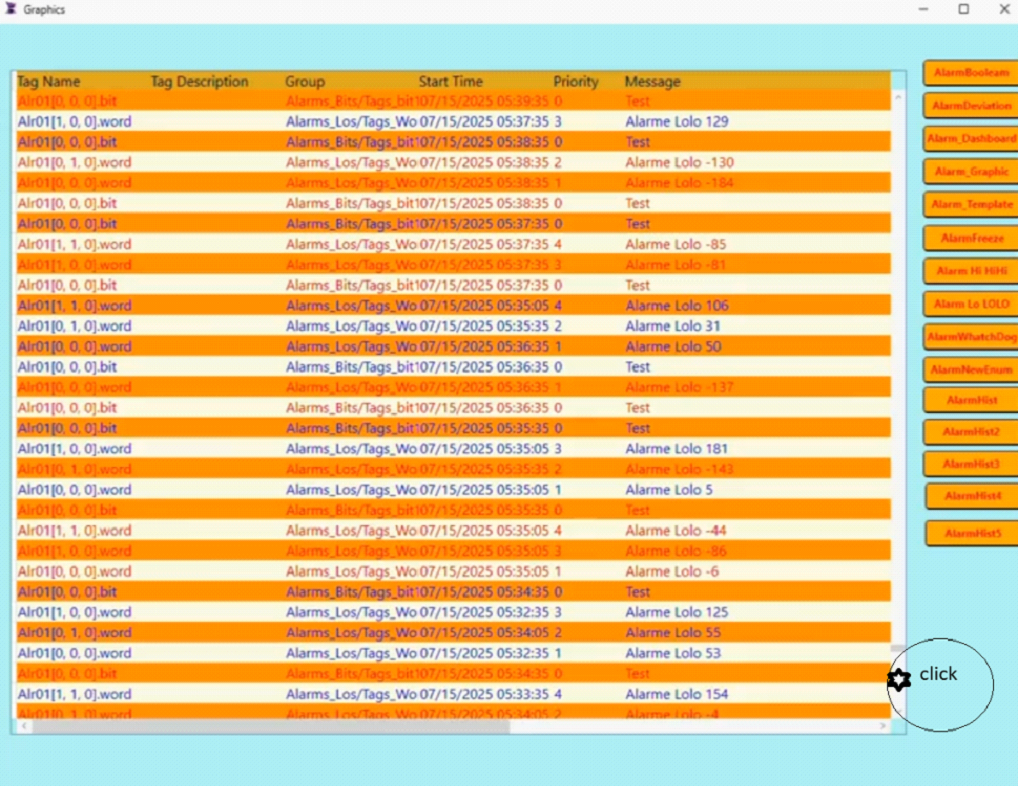
Alarm pagination has been implemented in the Viewer to improve performance and usability when handling large alarm datasets. By default, the alarm object initially loads up to 1,000 records. When the user scrolls to the bottom of the list, an additional 1,000 records are automatically retrieved, and this process continues as needed.
This behavior is now the default for the alarm object and does not require manual configuration. Pagination also applies when filters are used: the Viewer will load 1,000 records at a time, with additional records loaded as the user scrolls further.
As shown in the image below, a visible gap is presented when more records are available, prompting the user to scroll to retrieve the next set of alarms.
If you would like to learn more about alarms in ADISRA SmartView, we covered the topic in a previous blog. You can read it here.
We also provide several alarm examples, including the Alarm History Export Demo and the Alarm Sound Demo, which can be found on our website here.